Cookout Cravings
(Family Features) Something about summer brings out cravings for grilled perfection. Whether it’s the unmistakable flavor of a slow smoked side of ribs or a flame-kissed tenderloin, you can’t go wrong when you pull out the grill.
Barbecue enthusiasts, who only let the best meats grace their grills and smokers, know marbling is one of the best indicators of quality meat. Marbling is the tiny flecks of fat in the meat itself. These melt throughout the grilling process to infuse every bite with tenderness and flavor.
When you’re planning your menu for your next summer cookout, look for an option like Chairman’s Reserve Pork, which has strict standards to ensure marbling is part of every cut. Each cut is hand-selected and hand-trimmed to guarantee tender, juicy and flavorful results.
From savory to sweet to spicy, pork is the hero of each of these recipes, giving you plenty of ways to cure those summertime cravings. Find more grilling tips and recipes at chairmansreservemeats.com/recipes.

Grilled Pork Tenderloin and Vegetables
Recipe courtesy of pitmaster Tuffy Stone
Prep time: 2 hours
Cook time: 35 minutes
Servings: 4
Coriander Rub:
- 1 tablespoon kosher salt
- 1 tablespoon freshly ground black pepper
- 2 teaspoons freshly ground coriander seed
- 1 teaspoon granulated garlic
- 1 Chairman’s Reserve Pork Tenderloin (2 pounds)
- 4 tablespoons extra-virgin olive oil, divided
- 3 tablespoons Coriander Rub, divided
- 12 small carrots with tops, washed and dried
- 8 spring onions, washed and dried
- 12-18 thin asparagus spears, washed and dried
- 1 lemon, halved
- 2 cups watercress, arugula or spring salad greens mix, washed
- 1 tablespoon chives, thinly sliced
- 1 tablespoon tarragon leaves, torn or chopped
- 1 tablespoon Italian parsley, torn or chopped
- To make coriander rub: In airtight container, mix salt, black pepper, coriander seed and garlic together. Store until ready to use.
- To make tenderloin and vegetables: Brush tenderloin with 1 tablespoon olive oil. Evenly season both sides of pork with 1 tablespoon coriander rub and refrigerate 2 hours. Coat carrots, spring onions and asparagus with 2 tablespoons olive oil and season with 1 tablespoon coriander rub; refrigerate.
- Remove tenderloin and vegetables from refrigerator and bring to room temperature.
- Heat grill to 400 F using direct grilling setup. Place lemon halves, cut sides down, over hot coals and cook approximately 5 minutes, or until lemon halves are charred. Remove to cool.
- Place seasoned pork tenderloin over hot coals and grill 3-5 minutes. Using tongs, rotate meat every 3-5 minutes and cook until meat thermometer placed in thickest part of tenderloin reads 140 F (about 15 minutes). Remove tenderloin from heat and let rest 10 minutes.
- Place seasoned carrots, onion and asparagus on hot grill. Cook 3-4 minutes then turn and cook another 3-4 minutes. Transfer to plate.
- Toss salad greens in remaining olive oil, juice of 1 charred lemon half and 2 teaspoons coriander rub.
- Slice tenderloin into 1/4-inch medallions. Place grilled vegetables and medallions on platter; garnish with herbs and juice of remaining lemon half. Serve with spring greens salad.

Loin Back Ribs with Peach Jalapeno Glaze
Recipe courtesy of pitmaster Tuffy Stone
Total time: 5 hours
Servings: 4
Cool Smoke Barbecue Rub:
- 1/2 cup turbinado sugar
- 1/4 cup, plus 2 tablespoons, kosher salt
- 1/4 cup chili powder
- 2 tablespoons smoked paprika
- 3 tablespoons ground cumin
- 2 teaspoons ground oregano
- 2 teaspoons cayenne pepper
- 1 tablespoon, plus 1 teaspoon, black pepper
- 1 tablespoon, plus 2 teaspoons, granulated garlic
- 1 tablespoon, plus 2 teaspoons, granulated onion
Pork Ribs:
- 2 racks (1 1/2 pounds) Chairman’s Reserve pork loin baby back ribs
- 1 cup Cool Smoke Barbecue Rub
- 1/2 cup apple juice, in spray bottle
Peach Jalapeno Glaze:
- 1 cup peach preserves
- 1/2 cup chicken or pork stock
- 1/4 cup minced jalapeno (about 1 large jalapeno)
- 3 teaspoons Cool Smoke Barbecue Rub
- 2 teaspoon lemon juice
- To make cool smoke barbecue rub: In medium bowl, mix turbinado sugar, kosher salt, chili powder, smoked paprika, cumin, oregano, cayenne pepper, black pepper, garlic and onion thoroughly. Store in airtight container until ready to use.
- To make ribs: One hour before cooking ribs, use shaker to dust each rack evenly on both sides with 1/4 cup Cool Smoke Barbecue Rub per side.
- Heat smoker to 275 F.
- Place ribs meat-side up in smoker; cook 1 hour. Spray ribs with apple juice. Cook 1 hour more, spraying every 30 minutes and at end of cook time.
- Cut two 18-by-24-inch lengths of extra-heavy foil; set aside. When ribs turn reddish-brown, transfer from grill and place each rack meat-side down on foil. Wrap tightly, being careful not to puncture foil. Place foil-wrapped ribs, meat-side down, in smoker and cook 1 1/2-2 hours until tender. Open foil package and use skewer or toothpick to check tenderness.
- To make peach jalapeno glaze: In saucepan over low heat, stir peach preserves, stock, jalapeno, Cool Smoke Barbecue Rub and lemon juice. Cover and keep warm until ready to use.
- Remove ribs from foil, brush each rack with Peach Jalapeno Glaze (1/4 cup per side) and return to smoker meat-side up, 5-10 minutes to set sauce. Watch carefully to avoid burning sauce.
- Serve warm with extra Peach Jalapeno Glaze.
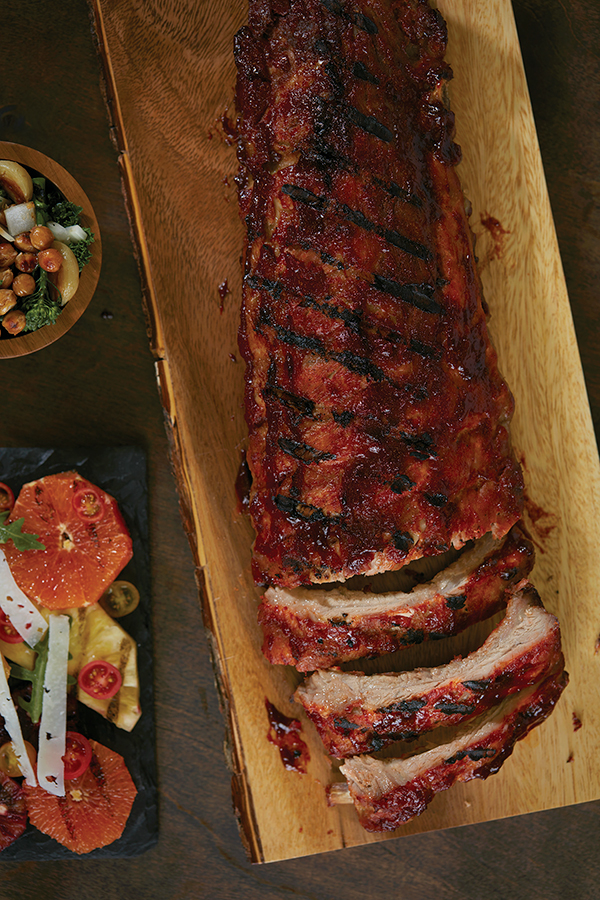
Oak Smoked Brown Sugar Chili Rubbed Ribs
Prep time: 40 minutes
Cook time: 4 hours, 50 minutes
Servings: 6
- Oak wood chips
- 1 can (6 ounces) tomato paste
- 2 tablespoons brown sugar
- 2 teaspoons chili powder
- 1 teaspoon cumin
- 1 teaspoon garlic powder
- 1 teaspoon onion powder
- 2 teaspoons kosher salt
- 2 racks Chairman’s Reserve pork loin baby back ribs
- Heat outdoor grill or smoker on low. Using charcoal, heat coals until white. Soak oak wood chips in water 15-30 minutes. Spread wood chips over coals or use smoke box.
- In mixing bowl, combine tomato paste, brown sugar, chili powder, cumin, garlic powder, onion powder and salt.
- Rub tomato mixture over ribs and grill 1 1/2 hours on direct heat. Wrap ribs using heavy duty foil and move to indirect heat about 3 hours until tender.
Source: Tyson Chairman’s Reserve
Summer Snacks that Satisfy Cravings
(Family Features) Road trips, outdoor adventures and relaxing by the pool are some of summer’s most popular activities, and all can be more enjoyable by adding favorite snacks to the mix. Next time you bask in the summer sun, bring along some tasty pecan snacks that allow you stay on track with wellness goals without sacrificing those snack-time delights.
Whether you enjoy their natural sweetness straight from the bag or add them to your go-to recipes, pecans are among the lowest in carbs and highest in fiber of tree nuts, an option that’s perfect for snacking. In fact, each ounce of pecans includes 3 grams of plant-based protein and 3 grams of fiber to go with 12 grams of “good” monounsaturated fat and only 2 grams of saturated fat.
Curb your snack cravings with a savory option like Buffalo-Pecan Pimento Cheese Dip with veggies and crackers, or if something sweeter tempts your taste buds, dive into a tangy treat with these Mini Pecan Lemon Berry Tarts.
Visit AmericanPecan.com for more snacking tips and recipes.
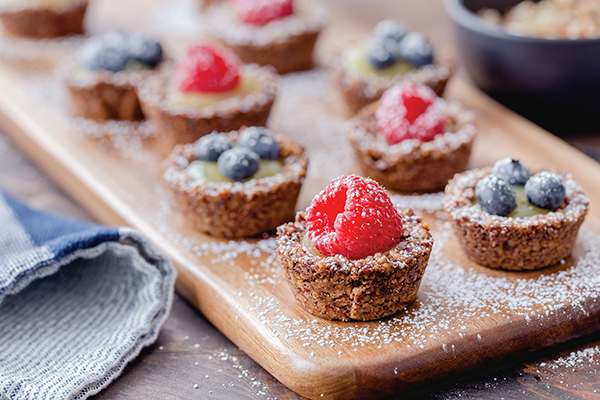
Mini Pecan Lemon Berry Tarts
Total time: 22 minutes
Servings: 24
Mini Pecan Crusts:
- Nonstick cooking spray
- 2 cups pecan pieces
- 1/4 cup butter, melted
- 2 tablespoons sugar
Lemon Filling:
- 1/2 cup lemon curd
- 1/2 cup blueberries, raspberries or combination
- powdered sugar, for dusting (optional)
- To make mini pecan crusts: Preheat oven to 350 F. Line mini muffin tin with paper liners or spray with nonstick cooking spray.
- In food processor, blend pecan pieces, butter and sugar until mixture forms coarse dough.
- Scoop about 2 teaspoons pecan mixture in each muffin tin. Use back of wooden spoon or fingers to press mixture evenly along bottom and up sides of each muffin cup.
- Bake 12 minutes, or until crusts are golden brown. Allow crusts to cool completely before removing from pan.
- To assemble crusts: Spoon 1 teaspoon lemon curd into each mini pecan crust. Top with one raspberry or three small blueberries. Dust with powdered sugar, if desired.
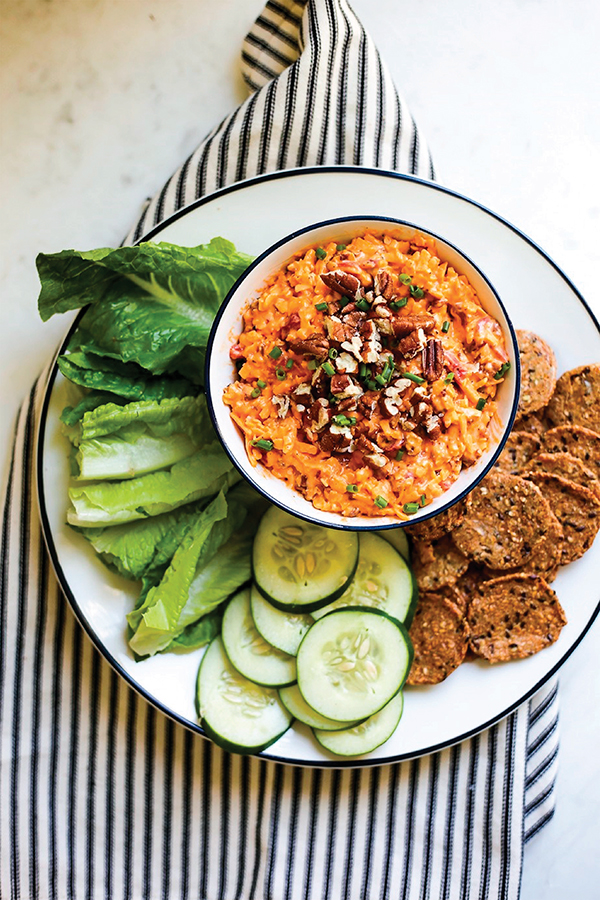
Buffalo-Pecan Pimento Cheese Dip
Total time: 15 minutes
Servings: 30
- 1 cup raw pecan pieces
- 1/2 pound (2 cups) sharp cheddar cheese, freshly grated
- 1 jar (4 ounces) sliced pimentos
- 2 tablespoons red hot sauce
- 2 tablespoons mayo
- 1 teaspoon kosher salt
- 1/2 teaspoon fresh cracked pepper
- 1 tablespoon chives, freshly chopped
- veggies, for serving
- crackers, for serving
- Preheat oven to 350 F.
- On baking sheet, spread pecans and roast 8-10 minutes, or until golden brown and fragrant, tossing once halfway through. Remove from oven and set aside to cool completely.
- In bowl, combine cheddar cheese, pimentos with juice, hot sauce, mayo, salt and pepper. Stir until combined. Add 3/4 of pecan pieces and mix until combined.
- Place dip in serving bowl and top with remaining pecan pieces and freshly chopped chives.
- Serve with veggies and crackers.
Source: American Pecan Council
3 Grilling Hacks for Delicious, Plant-Based Summer Menus
(Family Features) Cooking and entertaining outdoors can bring friends and family back together, but it doesn’t have to be complicated. Simple, flavorful recipes can be easy on the home chef yet still tasty and enjoyable for those at the table.
One of the best parts of the season is grilled fare like burgers, hot dogs and fresh vegetables. This year, consider adding a plant-based option to your menu. Made with simple, recognizable ingredients, Lightlife offers vegan, non-GMO options that are made for the grill, like Plant-Based Burgers, Smart Dogs and Italian Smart Sausage. These products can help satisfy the craving for protein and are made with ingredients you can feel good about serving your friends and family.
“Food brings people together, and now more than ever, grilling season and dining al fresco is one of the best ways to do that,” said Tommy McDonald, executive chef at Greenleaf Foods. “Think of the grill as an additional seasoning element – a zero-fuss way to add miles of flavor. One of my favorite products is Lightlife’s Smart Dogs, which have been reformulated to taste better than ever. Try topping them with a freshly made onion jam or quick-pickled relish.”
Consider these tips from McDonald to properly grill plant-based variations of your favorite meals:
Be mindful of cook times. Plant-based protein products typically taste best when cooked properly, usually over a low, open flame. When you’re almost ready to dish them out in recipes like Grilled Pineapple Burgers with Honey Garlic Barbecue Sauce or Avocado Toast Dogs, give them a quick sear. If you’re unsure, reference the recommended cook times on the packaging.
Keep it separate. During these seasonal celebrations, there’s often some people who want traditional meat and others who crave plant-based options. To satisfy your group, drop a cast-iron skillet on the grill and allow it to heat up. Put your favorite plant-based proteins in the skillet, along with veggies, to keep the grill organized.
Top it off. Don’t skimp on the toppings. The next time you’re looking to jazz up burgers, sausages or hot dogs, make an easy DIY onion jam to spread on top. While the burgers and dogs are on the grates, prepare some extra coals; once they’ve burned down a bit, bury foil-wrapped onions in the coals. After the onions are soft and warmed through, pull them out and enjoy a smokey onion jam.
For more simple summer recipes, visit Lightlife.com/Recipes.
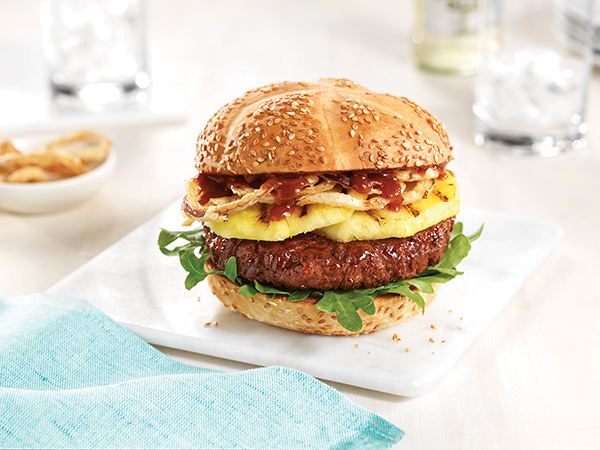
Grilled Pineapple Burgers with Honey Garlic Barbecue Sauce
Total time: 30 minutes
Serving: 2
- 2 rings freshly cored pineapple
- 2 Lightlife Plant-Based Burger patties
- salt, to taste
- pepper, to taste
- 2 sesame seed burger buns, lightly toasted
- 1 cup baby arugula
- 1/4 cup crispy fried onions
- 2 tablespoons honey garlic barbecue sauce
- Heat grill to medium. Grill pineapple slices 4-5 minutes per side until grill-marked and slightly caramelized. Cut slices in half and set aside. Wipe down grill.
- Season burger patties with salt and pepper, to taste. To grill burgers from refrigerator, grill 4-5 minutes per side until evenly browned with internal temperature of 165 F.
- To assemble burgers, layer toasted bottom buns with arugula then top each with burger patty and two slices grilled pineapple. Sprinkle with crispy fried onions and drizzle with barbecue sauce. Top each with top bun.
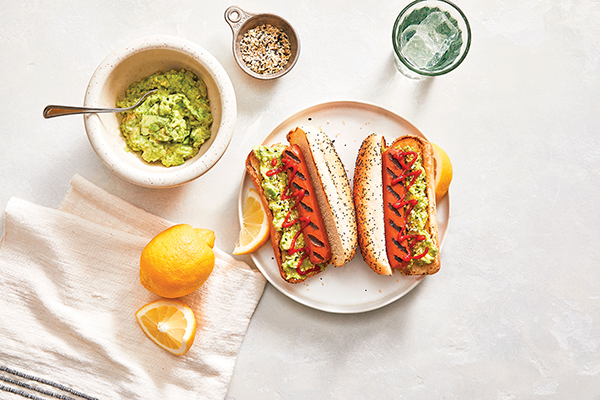
Avocado Toast Dogs
Total time: 15 minutes
Servings: 4
- Oil
- 2 medium avocados
- 1/2 lemon, juice only
- 1/4 teaspoon salt
- 1/4 teaspoon pepper
- 4 Lightlife Smart Dogs
- 4 hot dog buns
- 1/2 teaspoon everything bagel seasoning
- sriracha
- Lightly coat grill grates with oil and preheat to medium heat.
- In small bowl, mash avocados, lemon juice, salt and pepper. Cover and rest in refrigerator.
- Grill dogs 6-7 minutes, turning frequently.
- While dogs are grilling, lightly toast buns.
- Spread avocado mixture on one side of toasted buns. Sprinkle each with everything bagel seasoning. Add dogs and drizzle with sriracha.
Source: Lightlife
A Truly Memorable Summer Menu
(Family Features) Summer days are often spent with family and friends, soaking in the sun’s rays and enjoying outdoor living with warm-weather activities. Complement this year’s summertime excitement with food that matches your enthusiasm for the season.
Your menu can start with a fruity dip and a salad before diving into steak for the main course and a kid-friendly treat to top it all off. These recipes make the most of what summer has to offer with fresh fruits and veggies, bright and refreshing greens, tender cuts of meat and frozen treats that celebrate those memorable moments together.
Find more summer recipe inspiration at Culinary.net.
Dip Up a Good Time
Whether your summer days include planning extravagant meals or your on-the-go lifestyle calls for quick and easy recipes, simple snacks can fit a wide variety of menus. Dips are a perfect solution for afternoon pick-me-ups or evening appetizers when the whole family comes together.
This Apple Guacamole can be made in mere minutes, making it an ideal shareable among loved ones, by combining mashed avocados and seasonings with chopped Granny Smith apple pieces.
Visit Culinary.net for more snack ideas.
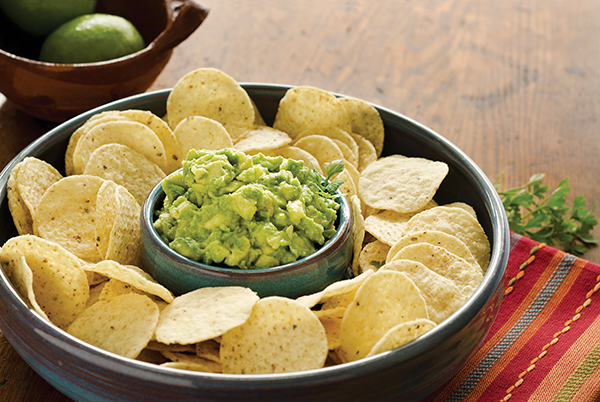
Apple Guacamole
Recipe adapted from the Meredith Corporation
Prep time: 10 minutes
Servings: 8-10
- 3 ripe avocados, halved and pitted
- 1/2 cup finely chopped Vidalia onion
- 1/2 cup snipped fresh cilantro
- 1 lime, juice only
- bottled hot pepper sauce, to taste
- 1 Granny Smith apple, peeled, cored and finely chopped
- kosher salt, to taste
- tortilla chips
- In bowl, use fork to mash avocados, onion, cilantro, lime juice and hot pepper sauce to desired consistency. Stir in apple and season with salt, to taste.
- Serve with tortilla chips.
Savor a Bite of Steak
A hearty flavor profile and perfectly prepared, high-quality meat can make a summer meal truly spectacular, especially when paired with fresh veggies in a protein-packed sandwich.
Inspired by Vietnamese tradition, this Steak Banh Mi recipe – which features tender grass-fed flat iron steak, pickled carrots, bright lettuce and crunchy cucumbers – is sure to be a crowd-pleaser at your next summer gathering. Take your taste buds to new heights with Silver Fern Farms natural cuts of 100% grass-fed beef from New Zealand, which is minimally processed with no added growth hormones or antibiotics. There, the animals roam and graze freely over lush green hills and pastures, resulting in lean, flavorful, nutritious meat that tastes just as nature intended.
Visit silverfernfarms.com for more inspiration.
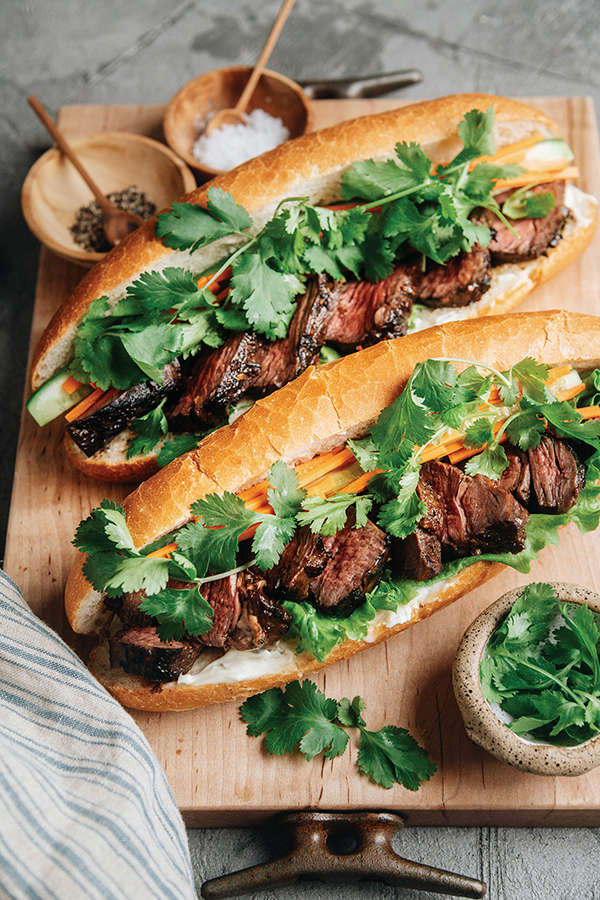
Steak Banh Mi
Prep time: 2 hours
Cook time: 15 minutes
Servings: 2
- 10 ounces Silver Fern Farms New Zealand grass-fed beef flat iron steak
- 2 teaspoons hoisin sauce
- 2 teaspoons soy sauce
- 2 teaspoons honey
- 1 teaspoon fish sauce
- 1 clove garlic, minced
- 1 teaspoon, plus 1/2 cup, rice vinegar, divided
- 1/8 teaspoon five-spice powder
- 2 tablespoons sugar
- 1 pinch salt
- 1 small carrot, cut into matchsticks
- 1 tablespoon vegetable oil
- 1/4 cup water
- 2 Vietnamese baguettes or dinner rolls
- 1/4 cup mayonnaise
- 4 Batavia lettuce leaves
- 1/4 cup cilantro, chopped
- 1 Persian cucumber, sliced
- Remove steak from packaging and set aside 10 minutes. Once steak reaches room temperature, place steak in deep plate or storage container. In small bowl, combine hoisin sauce, soy sauce, honey, fish sauce, garlic, 1 teaspoon rice vinegar and five-spice powder; pour over steak. Cover and marinate in fridge at least 2 hours, or overnight.
- In small pot over medium heat, heat remaining rice vinegar, sugar and salt. Cook and stir until sugar and salt dissolve. Remove from heat and let cool.
- Place carrots in deep plate or storage container. Pour cooled pickling liquid over carrots. Set aside to marinate.
- Remove steak from marinade and pat dry. Reserve marinade.
- Heat oven to 325 F.
- Heat heavy-bottomed pan over high heat and add oil. Once oil begins to smoke, add steak. Sear both sides, about 1 minute per side. Lower heat to medium.
- Add reserved marinade and water to pan. Cook, covered, 3 minutes, removing lid to flip meat occasionally. Remove lid and let sauce reduce 1 minute, or until slightly thickened.
- Transfer steak and sauce to large plate and let rest 10 minutes before slicing.
- Toast baguettes in oven 5 minutes. Let cool 5-10 minutes.
- Slice baguettes along middle without cutting through.
- Slice steak into thin pieces.
- Spread mayonnaise on baguettes and add 1-2 lettuce leaves to each. Layer steak on lettuce leaves followed by cilantro, cucumbers and pickled carrots. Slice baguette into two sandwiches.
Go for Satisfying Summer Greens
Many summer meals start with a simple yet satisfying appetizer: salad. This year, make sure you set the table with a bright, delightful bowl of greens that sets the tone for an enjoyable and festive meal with loved ones.
This Apple, Strawberry, Blueberry Salad calls for an array of fruits, including a homemade blueberry dressing, paired with Fresh Express 5-Lettuce Mix for a fresh and flavorful base with pecan halves to add crunch. The salads are thoroughly washed, rinsed and gently dried then sealed in Keep-Crisp bags to maintain freshness.
Find more salad inspiration at freshexpress.com.
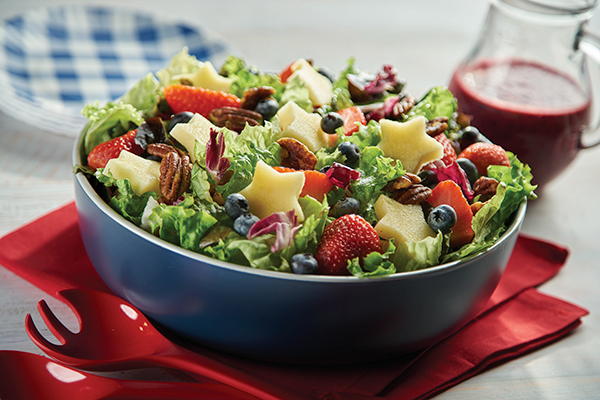
Apple, Strawberry, Blueberry Salad
Total Time: 30 minutes
Servings: 6
Blueberry Dressing:
- 2 cups fresh blueberries
- 1/4 cup balsamic vinegar
- 2 tablespoons honey
- 1 tablespoon lemon juice
- 1/2 cup olive oil
- salt, to taste
- pepper, to taste
- 2 large apples
- 2 packages (6 ounces each) Fresh Express 5-Lettuce Mix
- 1 pint strawberries, cut in half
- 1 pint blueberries
- 1/2 cup pecan halves, toasted
- blueberry dressing
- To make blueberry dressing: In blender, process blueberries, balsamic vinegar, honey, lemon juice, olive oil and salt and pepper, to taste, until smooth. Set aside.
- To prepare salad: Cut apples into 1/4-inch thick slices. Using 1-1/2-inch diameter star-shaped cutter, cut apple slices into stars.
- Place lettuce mix in large bowl; add apples, strawberries and blueberries. Sprinkle with pecans. Before serving, drizzle each salad with blueberry dressing.
Sweet, Summery Treats
After some fun in the pool and time spent in the sun, a cooling treat is often the perfect way to cap off a summer day. Fresh fruits make those sweet eats even tastier and easier by making dessert in the morning and letting it freeze while you enjoy the warmth outdoors.
These Watermelon Berry Frozen Pops make dessert about as simple as possible by blending watermelon, blueberries, raspberries and honey before adding to ice pop molds and freezing throughout the day. With the addition of refreshing watermelon, you’re opting for a flavorful fruit that includes just 80 calories and no fat while providing an excellent source of vitamin C (25%) and higher levels of lycopene (12.7 milligrams per 2-cup serving) – an antioxidant being studied for its role in sun protection – than any other fresh fruit or vegetable.
To find more summertime snacks, meals and treats, visit watermelon.org.
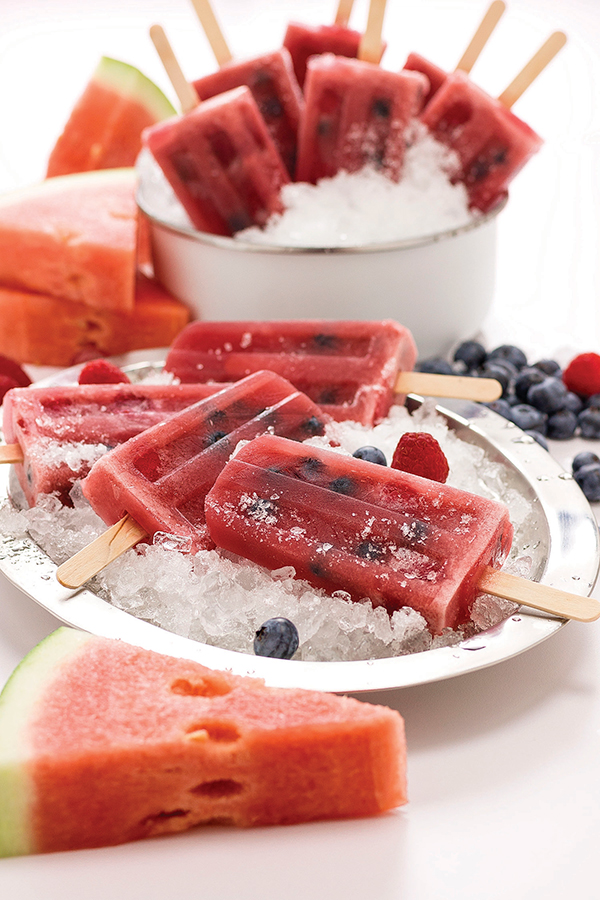
Watermelon Berry Frozen Pops
Servings: 8
- 6 cups watermelon
- 1 cup blueberries, divided
- 1 cup raspberries, divided
- 3 tablespoons honey
- In blender, blend watermelon, 1/2 cup blueberries, 1/2 cup raspberries and honey until smooth. Press through fine mesh strainer to remove pulp and seeds.
- Fill ice pop molds 3/4 full with liquid. Add remaining whole blueberries and raspberries to molds. Insert sticks and freeze at least 4 hours, or until completely frozen.
Photo courtesy of Getty Images (Apple Guacamole)
Source: Beef + Lamb New Zealand
Fresh Express
National Watermelon Promotion Board
Power Up Athletic Performance with Real Milk-Inspired Dishes
(Family Features) From little ones learning the game to professional athletes pushing sports to new levels, nutrition impacts the ability to re-energize, stay hydrated and reach peak performance. Now, new data shows that one naturally nutrient-rich beverage provides more benefits than previously thought: dairy milk.
For years, real milk has been recognized as a powerhouse beverage that delivers nine essential nutrients, including calcium, protein and vitamin D. However, updated nutrient daily values for nutrition labeling and more robust government nutrition databases have provided data that shows real milk delivers 13 essential nutrients, making it a good or excellent source of four more vital nutrients: potassium, zinc, selenium and iodine. These nutrients help build strong bones, maintain a healthy immune system and maintain your central nervous system, all of which directly impact athletic performance.
“As a kid, you thought of dairy milk as the drink that helped you grow and have strong bones,” said Briana Butler, MCN, RDN, LD, a performance and sports dietitian who advises athletes. “As you get older and start paying more attention to drinks’ attributes, you realize that truth applies to adults and athletes as well. Real milk is a trustworthy and nutrient-rich way to repair, rehydrate and replenish muscles and bodies. It is truly an undeniable favorite of mine to fuel performance.”
As the “original sports drink,” real milk has fueled athletes for centuries and offers a natural nutrient combination not found in formulated sports drinks. It provides benefits for fitness enthusiasts of all ages including building lean muscle, maintaining strong bones and supporting a healthy immune system.
With 13 nutrients, real milk isn’t just the ultimate training fuel, it also makes your favorite recipes more tasty and nutritious. Dishes such as Zucchini Oatmeal Muffins are made in just 15 minutes and are a quick and nutritious snack that can be enjoyed on the go, crumbled over yogurt or paired with eggs for a morning power-up. You can also try Rattle Snake Pasta, a better-for-you version of a family favorite that combines rotisserie chicken, peppers and linguine.
Visit gonnaneedmilk.com for more information on real milk’s nutrition and for milk-inspired meals.
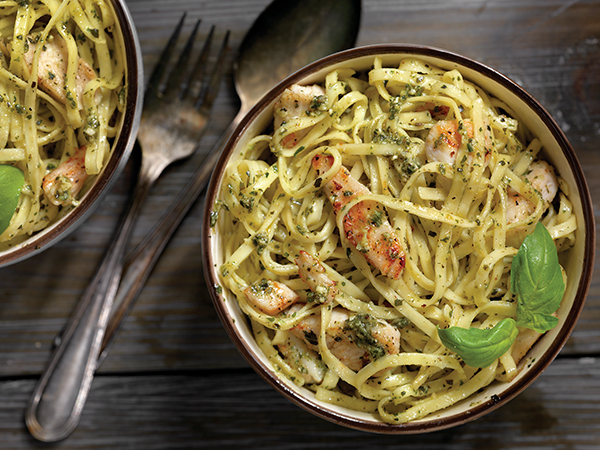
Rattle Snake Pasta
Recipe courtesy of registered dietitian Bri Butler and Power Portions
Total time: 15 minutes
Servings: 6
- 1/4 cup buttery spread
- 2 tablespoons all-purpose flour
- 3/4 cup dairy milk (2% recommended)
- 1/2 cup vegetable broth
- 1 tablespoon vegetable base
- 1/2 cup Parmesan cheese, shredded
- salt, to taste (optional)
- pepper, to taste (optional)
- 1/4 cup pickled jalapeno slices
- 3 tablespoons minced garlic
- 10 ounces cooked rotisserie chicken, shredded
- 1 green bell pepper, sliced
- 1 red bell pepper, sliced
- 1 handful fresh cilantro, minced
- 1 pound whole-wheat linguini, cooked
- In medium pot, melt buttery spread then add flour; mix well. Slowly add dairy milk and vegetable broth, stirring well.
- Add vegetable broth and Parmesan cheese; heat slowly until thickened. Add salt and pepper, to taste, if desired.
- Add jalapenos, garlic, bell peppers and roasted chicken; heat thoroughly.
- Serve over cooked linguini.
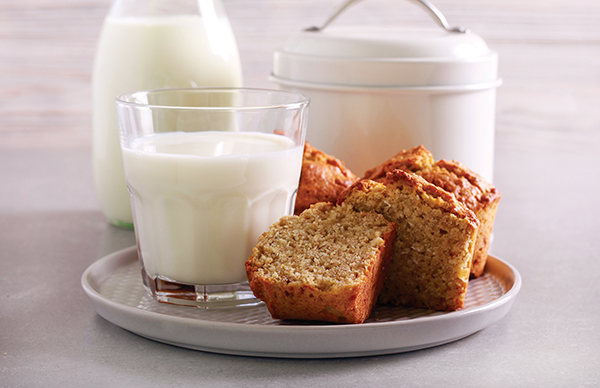
Zucchini Oatmeal Muffins
Recipe courtesy of registered dietitian Bri Butler and Power Portions
Total time: 15 minutes
Servings: 12
- 1 zucchini
- 1 1/2 cups dairy milk (2% recommended)
- 3 bananas
- 6 pieces pitted Deglet Noor dates
- 1 teaspoon vanilla extract
- 2 tablespoons safflower oil
- 2 1/2 cups old-fashioned oats
- 1 1/2 teaspoons baking powder
- 1 1/2 teaspoons salt
- 1 teaspoon ground cinnamon
- Preheat oven to 350 F.
- Grate zucchini. Using kitchen towel or cheesecloth, wring as much water as possible. Set aside.
- In blender, blend dairy milk, banana, dates, vanilla and oil until smooth. Set aside.
- In large bowl, combine oats, baking powder, salt and cinnamon.
- Combine milk mixture, zucchini and oat mixture until well combined. Pour into coated 12-muffin pan.
- Cook 30 minutes, or until golden brown.
- Tips: Pair muffin (counts as one grain) with eggs and unsweetened nut butter for a balanced meal. Crumble over plain yogurt for parfait twist.
Photos courtesy of Getty Images
Source: MilkPEP
Sizzling Meals Made for Summer
(Family Features) Summertime, for many, represents an opportunity to enjoy freshly cooked meals while enjoying time outdoors. Taking your dishes from ordinary to extraordinary starts with chef-inspired recipes that call to mind the flavors of the season.
Whether you’re a steak enthusiast who enjoys nothing more than a tender cut or a summer burger connoisseur looking for a fresh twist on tradition, these recipes call for high-quality beef from Omaha Steaks. Created by Omaha Steaks Executive Chef David Rose, the New York Strips Oscar-Style complement the thick, juicy, marbled flavor of the steaks with sauteed asparagus, bearnaise sauce and jumbo lump crab meat. Or turn your attention to Fried Lobster Po Boy Burgers with pimento remoulade sauce for a tempting way to combine two summertime favorites – seafood and burgers.
Visit OmahaSteaks.com for more summer meal inspiration.
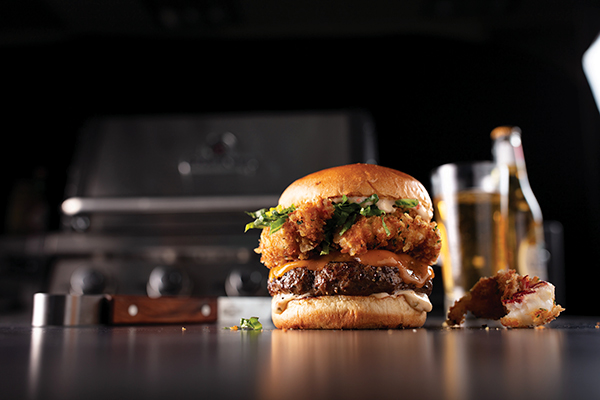
Fried Lobster Po Boy Burgers
Recipe courtesy of Omaha Steaks Executive Chef David Rose
Prep time: about 20 minutes
Cook time: about 20 minutes
Servings: 2
Pimento Remoulade:
- 1/2 cup mayonnaise
- 1 1/2 tablespoons minced pimentos
- 1 tablespoon Dijon mustard
- 1 tablespoon minced bread and butter pickles
- 1 pepperoncino (seeded and minced)
- 1/4 teaspoon smoked paprika
- 1/4 teaspoon garlic powder
- 1/4 teaspoon freshly ground black pepper
- 1 tablespoon freshly squeezed lemon juice
- 3 dashes hot sauce
- kosher salt, to taste
Fried Lobster Tails:
- Vegetable oil, for frying
- 1/2 cup all-purpose flour
- 1/2 teaspoon kosher salt, divided
- 1/2 teaspoon freshly ground black pepper, divided
- 1/4 teaspoon garlic powder
- 1/4 teaspoon smoked paprika
- 1 large egg
- 1 tablespoon water
- 2 dashes hot sauce
- 1/4 cup potato chips, finely blended in food processor
- 1/3 cup panko breadcrumbs
- 1 tablespoon minced flat leaf Italian parsley
- 2 Omaha Steaks lobster tails (5 ounces each)
Cheeseburgers:
- 1 pound Omaha Steaks premium ground beef
- salt, to taste
- freshly ground black pepper, to taste
- 2 tablespoons unsalted butter, at room temperature
- 2 brioche buns
- 2 slices yellow cheddar cheese
- 3 leaves romaine lettuce, shredded
- To make pimento remoulade: In small bowl, mix mayonnaise, pimentos, mustard, pickles, pepperoncino, paprika, garlic powder, black pepper, lemon juice and hot sauce until well incorporated. Season with salt, to taste.
- To make fried lobster tails: Preheat grill to 400 F and add oil to 10-inch cast-iron pan about 1/2-inch deep.
- In medium bowl, whisk flour, 1/4 teaspoon salt, 1/4 teaspoon pepper, garlic powder and smoked paprika until well incorporated. Set aside.
- In separate medium bowl, whisk egg, water and hot sauce. Set aside.
- In third medium bowl, whisk potato chips, panko breadcrumbs and parsley until well incorporated. Set aside.
- Cut lobster tails in half lengthwise, remove meat from shell and season with remaining kosher salt and black pepper.
- Toss halved lobster tails in flour mixture first, egg mixture second then potato chip mixture third, coating thoroughly.
- Fry lobster tails 3-4 minutes on each side until golden brown and cooked through. Close grill lid between flipping.
- To make cheeseburgers: Preheat grill to 450 F using direct heat. Form ground beef into two 1/2 pound patties, each about 1/2-inch thick.
- Using thumb, make dimple in center of each patty to help cook evenly.
- Season both sides of burger with salt and pepper, to taste. Spread butter on each cut side of buns.
- Grill burgers 4-5 minutes per side for medium doneness.
- Add one slice cheddar cheese on each burger, close lid and grill about 30 seconds to melt cheese. Remove patties from grill to clean plate. Place buns cut sides down on grill grates and toast 20-30 seconds, or until well toasted, being careful to avoid burning.
- To assemble: Place desired remoulade on buns. Place cheeseburgers on bottom buns. Top each with two fried lobster tail halves. Place handful shredded lettuce on lobster tails. Top with buns.
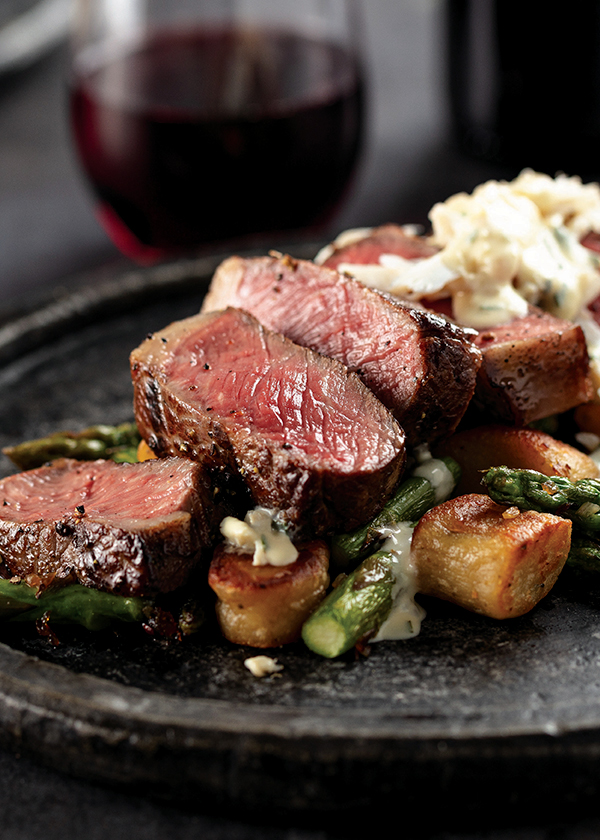
New York Strips Oscar-Style
Recipe courtesy of Omaha Steaks Executive Chef David Rose
Prep time: about 30 minutes
Cook time: about 3 1/2 hours
Servings: 4
Sauteed Asparagus:
- 1/2 pound jumbo asparagus (about 1 bunch), blanched in salted boiling water
- 3 tablespoons olive oil
- 2 garlic cloves, minced
- 2 tablespoons minced shallots
- salt, to taste
- freshly ground black pepper, to taste
Bearnaise Sauce:
- 1/4 cup white wine vinegar
- 2 tablespoons minced shallots
- 1 tablespoon chopped tarragon
- 3 egg yolks
- 2 tablespoons water, plus additional for boiling, divided
- 2 dashes hot sauce
- 12 tablespoons unsalted butter, melted
- salt, to taste
- freshly ground black pepper, to taste
Jumbo Lump Crab Meat:
- 1 pound jumbo lump crab meat
- 2 tablespoons kosher salt
New York Strip Steaks:
- 4 Omaha Steaks Private Reserve or Butcher’s Cut New York Strips (10 ounces each)
- salt, to taste
- freshly ground black pepper, to taste
- water
- 4 tablespoons grapeseed oil
- 4 tablespoons unsalted butter
- 3 garlic cloves
- 2 fresh thyme sprigs
- To make asparagus: Cut asparagus stalks into 1/4-inch pieces. Heat large pan over medium-high heat and add olive oil.
- Add garlic and shallots to pan; lightly saute about 20 seconds, or until fragrant.
- Add asparagus to pan; saute about 2 minutes until lightly browned. Add salt and pepper, to taste.
- To make bearnaise sauce: In small saucepan, bring vinegar, shallots and tarragon to boil then reduce to simmer 3-4 minutes until reduced by about half. Cool to room temperature.
- Bring medium pot half full of water to slow boil.
- In small bowl, whisk egg yolks, vinegar reduction, water and hot sauce until well incorporated.
- Place bowl over pot of boiling water and continue whisking ingredients until it starts to emulsify and becomes sauce-like. Alternate whisking on and off heat every 30 seconds to prevent eggs from scrambling.
- Gradually add melted butter, continuously whisking until sauce becomes rich with ribbony consistency and sets up. Season with salt and pepper, to taste. If too thick, add 1 tablespoon water at a time and whisk to desired consistency.
- To make crab meat: In medium bowl, lightly toss crab meat with salt until well coated.
- To make steaks: Pat steaks dry with paper towels and season heavily with salt and pepper, to taste. Bring steaks to room temperature.
- Place sous vide immersion circulator in pot of water and set to 5 F below target doneness.
- Place seasoned steaks in sous vide bag or zip-top bag and cook 2 hours.
- Remove bag and remove steaks from bag. Pat steaks dry with paper towels.
- Warm large cast-iron pan over high heat and add oil. Add steaks, butter, garlic cloves and thyme leaves. After about 1 minute, steaks should start to brown.
- Flip steaks and baste with butter until caramelized. Remove steaks from pan and rest 7-8 minutes.
- To assemble: Place asparagus on bottom of plate. Top with steaks (whole or sliced), crab meat and bearnaise sauce.
Source: Omaha Steaks
Easy, Satisfying Spring Recipes
(Family Features) Whether you enjoy your spring meals al fresco or simply turn to warm-weather dishes at the comfort of your own dining table, the season brings with it a perfect excuse to shake up your menu.
Lighter fare is often the way to go as temperatures climb, but that doesn’t mean you have to settle for a regular sandwich or a boring salad. Instead, enhance these springtime classics by rethinking tradition in tasty (yet easy) ways.
This Sabich recipe calls for a multitude of fresh flavors including Aunt Nellie’s Pickled Beets and Onions and hard-boiled eggs plus a variety of veggies, hummus and ethnic seasonings. Or, if a quick and easy salad calls your name for an outdoor meal, this Tossed Bean Salad with Lemon Vinaigrette requires only READ Bean Salad, mixed greens and a handful of other ingredients.
Find more easy springtime dishes at readsalads.com and auntnellies.com.
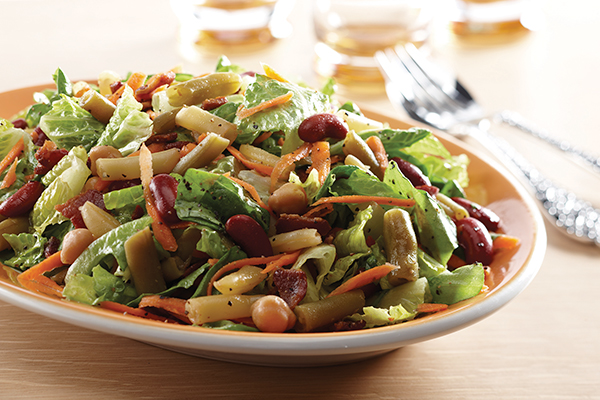
Tossed Bean Salad with Lemon Vinaigrette
Prep time: 15 minutes
Servings: 4
- 1 can (15 ounces) READ 3 or 4 Bean Salad
- 2 tablespoons lemon juice or white wine vinegar
- 2 tablespoons olive oil
- coarsely ground black pepper, to taste
- 1 package (about 10 ounces) mixed salad greens with carrots
- 4 slices bacon (about 1/4 cup), cooked crisp and crumbled (optional)
- shaved Parmesan or Asiago cheese (optional)
- Drain bean salad well; in small bowl, reserve 1/2 cup liquid.
- To make dressing: Whisk reserved bean liquid and lemon juice then whisk in oil. Add pepper, to taste.
- Place salad greens in bowl. Add bean salad and bacon. Add dressing, as desired. Toss gently to coat. Arrange on platter; top with shaved cheese, if desired.
Variation: Top salad with sliced grilled chicken then top with cheese.
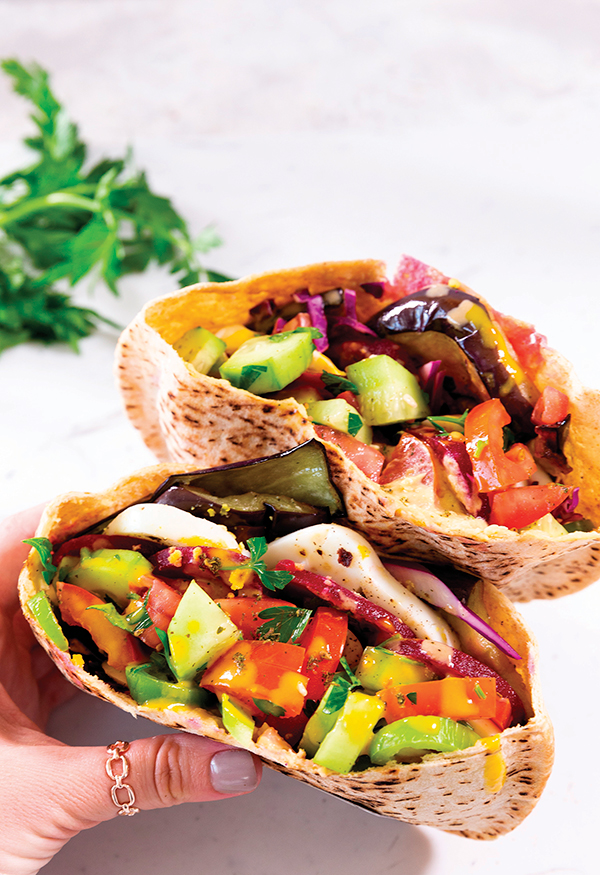
Sabich
Recipe courtesy of eazypeazymealz.com
Prep time: 20 minutes
Servings: 4
- 1 jar (16 ounces) Aunt Nellie’s Pickled Beets and Onions
- 1 medium eggplant
- 2 teaspoons salt, plus additional, to taste, divided
- 1 cup vegetable oil
- 4 hard-boiled eggs, sliced
- pepper, to taste
- 1 1/2 teaspoons za’atar, plus additional for serving, divided (optional)
- 1/2 teaspoon sumac, plus additional for serving, divided (optional)
- 1 cucumber, diced
- 3 Roma tomatoes, diced
- 1/3 cup fresh parsley, finely chopped
- 1/2 lemon, juice only
- 4 whole-grain pita breads with pockets
- 1/2 cup hummus
- 2 cups shredded red cabbage
- 1 medium green bell pepper, thinly sliced
- 1/4 cup Amba pickled mango sauce (optional)
- 1/4 cup tahini
- Drain beets and onions; set aside.
- Wash eggplant. Slice into 3/8-inch-thick pieces. Place slices on cooling rack. Add 2 teaspoons salt to slices to draw out extra moisture. Let sit 10 minutes. Pat extra moisture off.
- In large 14-inch skillet, heat vegetable oil over medium heat. Once oil is hot, place eggplant slices in oil; fry until browned, about 3 minutes per side, in batches of four pieces. Place on paper towel-lined plate to absorb additional oil.
- Season hard-boiled egg slices with salt and pepper, to taste. Season with 1/2 teaspoon za’atar and sumac, if desired. Set aside.
- To make salad: In medium bowl, combine cucumber, tomatoes, parsley, lemon juice and remaining za’atar. Set aside.
- Gently slice one end of each pita and open pocket. In microwave on high, heat pitas 10 seconds. Place equal amounts fried eggplant in each pita. Spread 2 tablespoons hummus in each pita. Gently layer one-fourth of egg slices, beets and onions, cabbage, Israeli salad and green peppers in each pita.
- Drizzle each sabich with about 1 tablespoon amba sauce, if desired, and 1 tablespoon tahini. Season with additional salt and pepper or sumac and Za’atar, if desired.
Source: Seneca Foods
Aunt Nellies
A Vibrant, Flavorful Spring Meal Prepped in 20 Minutes or Less
(Family Features) Adding delicious, new flavors to your homecooked meals this spring may be easier than you think. A secret ingredient like cooking wine is a simple way to add a boost of flavor to all kinds of recipes.
During the spring months, few people would prefer cooking in the kitchen for hours rather than enjoying the outdoors. Make spending time with family and friends even more special by sharing a quick, delicious, spring-inspired meal together. Time-saving dishes at home begin with an option like Holland House® Cooking Wines that add an extra boost of flavor to recipes like Chicken Gyro Bowls. Perfect for a weeknight meal, the recipe combines pantry staples and enticing seasonings for an easy-to-make dish using a slow cooker.
Featuring savory chicken gyro meat atop a scoopful of rice, crisp and vibrant veggies, and garnished with crumbly feta and tangy tzatziki sauce, the bowls are bursting with flavor and perfect for the season.
Cooking wines are flavor-enhancing ingredients that can quickly transform an ordinary meal into an extraordinary one. Available in four flavors – Marsala, Sherry, White and Red – Holland House Cooking Wines are made with fine grapes and perfectly blended seasonings, aged to perfection, to offer bold flavor to your springtime cooking. Consider these uses for each variety:
Sherry cooking wine works equally well in dessert recipes, main dishes, sides, soups and sauces. One example is these delicious Chicken Gyro Bowls, which you can leave cooking in the Crockpot™ throughout the day. The remaining preparation is fast for a weeknight meal that’s ready in next to no time.
Best known for its use in chicken marsala, marsala cooking wine lends flavor to other preparations, too. Marinate sliced meat in marsala cooking wine before grilling, roasting or sauteing, or swirl it into gravies and soups to add delicious, savory flavor.
Stir red cooking wine into gravies and red sauces, or try marinating less-tender cuts of beef, lamb or pork in the refrigerator (for up to 24 hours) to boost flavor and tenderness.
White cooking wine pairs well with fish and lighter fare like chicken and turkey, as well as rice dishes.
Find more recipes to bring mouthwatering flavor to your springtime table at HollandHouseFlavors.com and crock-pot.com/slow-cookers.
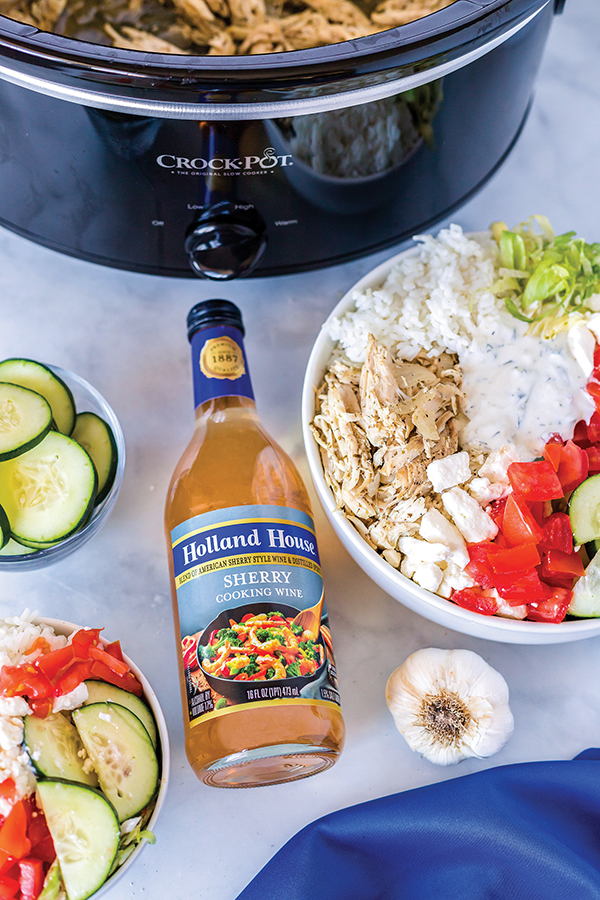
Chicken Gyro Bowls
Recipe courtesy of Jillian of Food, Folks and Fun
Prep time: 20 minutes
Cook time: 4-6 hours
Servings: 6
Chicken Gyro Meat:
- 1/4 cup Holland House Sherry Cooking Wine
- 3/4 cup chicken broth
- 2 tablespoons lemon juice
- 1 1/2 tablespoons dried oregano
- 1 teaspoon salt
- 1/2 teaspoon pepper
- 1 medium yellow onion, roughly chopped
- 2 pounds boneless, skinless chicken breasts, thawed
- 4 large garlic cloves, minced
Gyro Bowls:
- 2 cups long-grain rice
- 1 medium cucumber, seeded and sliced
- 1 large tomato, chopped
- 1 cup shredded iceberg lettuce
- 1/2 cup crumbled feta cheese
- 1 1/2 cups tzatziki sauce
- black pepper, to taste
- 4 pitas, warmed and cut into wedges
- To make chicken gyro meat: In small bowl or liquid measuring cup, whisk cooking wine, chicken broth and lemon juice; set aside.
- In separate small bowl, combine dried oregano, salt and pepper; set aside.
- Add chopped onion to bottom of slow cooker and lay chicken breasts on top of onions.
- Pour cooking wine mixture over onions and chicken.
- Sprinkle half of oregano mixture over top of chicken. Flip chicken over and sprinkle remaining oregano mixture over chicken.
- Evenly distribute minced garlic over chicken.
- Cover slow cooker with lid and cook on high 4-6 hours or low 6-8 hours.
- Shred cooked chicken then use wooden spoon to mix shredded chicken, onions and remaining liquid together. Turn off slow cooker and let mixture sit, with lid on, while preparing rice.
- To make gyro bowls: Cook rice according to package instructions.
- Place rice in bowls and top with chicken gyro mixture, cucumber, tomato, lettuce, feta, tzatziki sauce and black pepper, to taste. Serve with pita wedges.
Souce: Holland House
Go Gluten-Free with Family Favorites
(Family Features) Time available to cook, your family's preferred dishes, ingredients you have in the pantry - there are plenty of considerations that may limit your options for an at-home menu. Add in a gluten allergy, or simply a desire to avoid it, and it may feel impossible to appease everyone.
However, all it takes is simple ingredient swaps to turn a family favorite into a gluten-free recipe. From pizza at dinnertime to a chocolatey dessert, these dishes offer easy, flavorful ways to make your menu gluten-free.
A Healthier Homemade Pizza
Creating a gluten-free dinner can be as easy as tweaking some of your loved ones' favorite meals. Even pizza can offer a gluten-free solution when you rethink the ingredients included.
Satisfy your family's needs with an option like Toufayan Gluten-Free Wraps in place of traditional crust in this Gluten-Free Barbecue Skillet Pizza. Made from wholesome, all-natural ingredients with no cholesterol or trans fats, these easily foldable wraps are available in four flavors, making them perfect for homemade pizza.
Visit Toufayan.com to find more mealtime solutions.
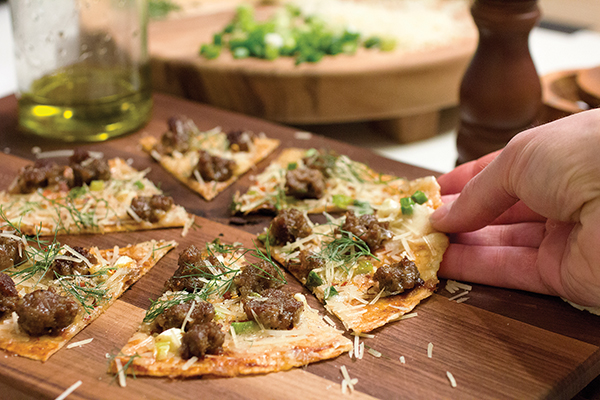
Gluten-Free Barbecue Skillet Pizza
Servings: 6
- 1 tablespoon olive oil, divided
- 1 Toufayan Gluten-Free Original Wrap
- 3 tablespoons gluten-free barbecue sauce
- 4 cooked sausage links, crumbled
- 2 cups diced Mozzarella cheese
- 2 tablespoons chopped green onion
- fresh Parmesan cheese, for garnish (optional)
- fresh fennel fronds, for garnish (optional)
- crushed red pepper, for garnish (optional)
- salt, to taste
- pepper, to taste
- Heat oven to broil.
- Heat cast-iron skillet over medium heat. Add 1-2 teaspoons olive oil; spread to cover bottom of skillet.
- Place wrap in skillet, brush with barbecue sauce and add sausage, Mozzarella and green onion.
- Fry 2-3 minutes, or until bottom of wrap is golden and crispy.
- Place skillet under broiler until cheese is melted and bubbly, about 2 minutes.
- Remove from broiler, place on cutting board and sprinkle with Parmesan, fennel fronds and crushed red pepper, if desired.
- Season with salt and pepper, to taste; drizzle with remaining olive oil, cut and serve.
Dish Up a Dynamic Dessert
Going gluten-free isn't just for meals from breakfast to dinner - you can cut gluten from delicious desserts, too.
This Cookie Brownie Supreme calls for layers of cookie dough, cookies and brownies for a taste bud tempting way to round out a meal with those you love. One of the key ingredients is Goodie Girl Chocolate Creme Sandwich Cookies, made with real cocoa and a sweet cream filling between two chocolate wafers. They're made without artificial flavors, colors or preservatives for a gluten-free, vegan and peanut-free treat.
Find more varieties and dessert ideas at goodiegirl.com.
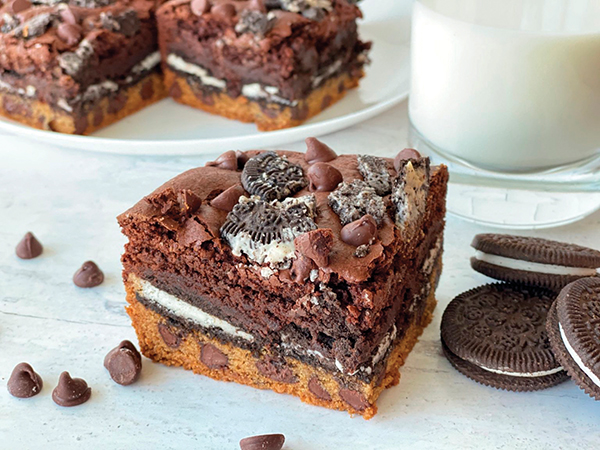
Cookie Brownie Supreme
Recipe courtesy of glutenfreewith3.com
Cookie Dough Layer:
- 1 stick softened butter
- 1/2 cup brown sugar
- 1/4 cup sugar
- 1 1/4 teaspoons vanilla extract
- 1 egg
- 1/2 teaspoon baking soda
- 1/4 teaspoon salt
- 1 1/4 cups gluten-free flour
- 1 cup semi-sweet chocolate chip
Cookie Layer:
- 25 Goodie Girl Chocolate Creme Sandwich Cookies
Brownie Layer:
- 1 stick butter
- 1 1/2 cups sugar
- 1/2 teaspoon salt
- 1 teaspoon vanilla extract
- 3/4 cup cocoa powder
- 3 eggs
- 3/4 cup gluten-free flour
- 1 teaspoon baking powder
- 6 Goodie Girl Chocolate Creme Sandwich Cookies, crushed
- 1/4 cup semi-sweet chocolate chips
- vanilla ice cream (optional)
- chocolate syrup (optional)
- Preheat oven to 350 F. Prepare 9-by-9-inch cake pan with parchment paper.
- To make cookie dough layer: In large bowl, combine softened butter, brown sugar, sugar and vanilla. Mix with handheld mixer until combined and creamy. Add egg and beat until combined.
- In small bowl, combine baking soda, salt and flour. Beat flour mixture gradually into sugar mixture. Once completely combined, fold in chocolate chips. Add cookie dough layer to bottom of prepared pan and spread evenly.
- To make cookie layer: Layer cookies on top of cookie dough layer.
- To make brownie layer: In saucepan, melt butter, sugar and salt until completely combined. Remove from heat and transfer to large bowl. Add vanilla, cocoa and eggs; mix. Slowly add flour and baking powder. Mix until completely combined.
- Pour brownie mixture over cookie layer. Spread evenly.
- Top with crushed cookies and chocolate chips.
- Bake 50 minutes. Let cool completely before removing from pan. Slice and top with vanilla ice cream and chocolate syrup, if desired.
Source: Toufayan
Pro Tips for Perfecting Pasta
(Family Features) Next time hunger calls in your home, turn to a filling family favorite: pasta. With a nearly endless variety of pasta types, sauce pairings and recipe ideas, the options are aplenty, and cooking is often a breeze.
Consider these pasta cooking tips from Rouxbe, an online culinary school training people of all abilities to become better, more confident cooks.
- Use a large, straight-sided pot with 6 quarts of water for every 1 pound of pasta. Bring to a boil, add 1 teaspoon of salt for each quart of water and stir to dissolve.
- Wait for rapidly boiling water before adding pre-made pasta then cook according to package instructions for al dente, which means the pasta offers a slight resistance. For stuffed or fresh pasta, aim for a gentle boil and cook 1-5 minutes. Reserve 1 cup of pasta water for use in sauces then drain (never rinse) your pasta.
- Add pasta to your sauce; never the other way around. Pair thin pastas like angel hair with lighter sauces, seafoods, basil and light oils. Fettucine, penne and rigatoni complement spicy sausage, heavy creams and chunky ragu. When in doubt, spaghetti offers a versatile option.
Pasta is a natural fit for fresh veggies, and you can put your skills to the test with Pappardelle with Garden Vegetables or create Homemade Potato Gnocchi to freeze and enjoy later.
For more information, visit rouxbe.com.
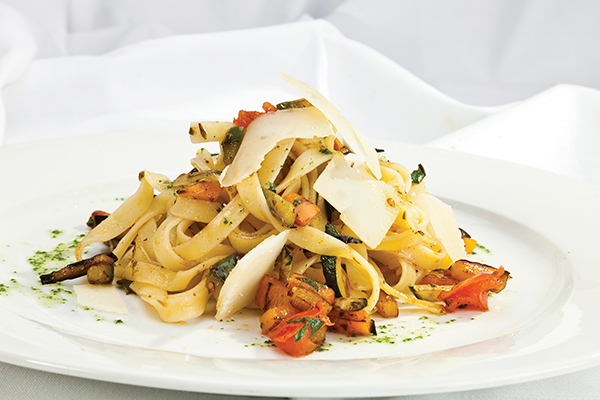
Pappardelle with Garden Vegetables
Total time: 1 hour
Servings: 3-4
- Salted water
- 3 tablespoons olive oil
- 3 tablespoons shallots or white onion, minced
- 2 cloves garlic, minced
- 1/4 teaspoon chili flakes
- 1 cup white wine
- 2 cups pappardelle noodles
- 3/4 cup vegetable stock
- 3 tablespoons capers (optional)
- 2 vine-ripened tomatoes, sliced in wedges
- 1 handful baby kale
- 1 fresh lemon, juice only
- 2 tablespoons butter (optional)
- sea salt, to taste
- freshly ground black pepper, to taste
- 1 handful fresh basil, torn
- Bring large pot of salted water to boil.
- In fry pan on medium-high heat, add olive oil and onions; saute 2 minutes. Lower heat slightly and add garlic and chile flakes. Saute on medium heat 2-3 minutes. Add white wine and deglaze pan. Cook 3 minutes. Remove from heat and keep warm until ready to add freshly cooked pasta.
- In pot of boiling water, add pappardelle. Cook according to package instructions then drain.
- Place fry pan back on medium heat. Add drained pasta; vegetable stock; capers, if desired; tomatoes; baby kale; and lemon juice. Add butter, if desired, and toss well. Cook 2-3 minutes, tossing occasionally, and season with salt and pepper, to taste, and fresh basil.
- Toss again, remove from heat and serve.
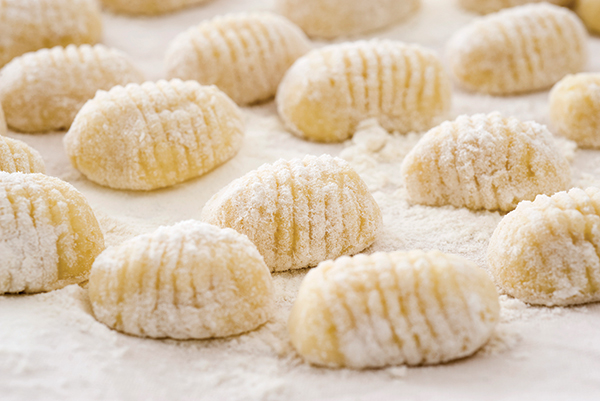
Homemade Potato Gnocchi
Total time: 2 hours
Servings: 2-4
- 2 medium Yukon Gold or russet potatoes
- 3/4 teaspoon sea salt, divided
- 2 teaspoons water
- 1 cup all-purpose flour, divided, plus additional, for surface
- 1/4 teaspoon freshly grated nutmeg
- 1/8 teaspoon white pepper
- 2 large egg yolks
- Preheat oven to 400 F. Place potatoes on sheet of foil, add 1/2 teaspoon salt and water; wrap. Bake 40 minutes, or until cooked through.
- Peel potatoes while hot. Cut and rice potatoes. Let potatoes cool completely.
- To make dough, sprinkle potatoes with flour. Aerate with bench scraper then add remaining salt, nutmeg and white pepper.
- Break up egg yolks and pour over potatoes. Cover surface with flour. Continue cutting and gently lifting dough.
- Test dough by squeezing gently; it shouldn’t stick. Add flour, if needed.
- Shape dough into rectangle and fold several times, using fingertips to bring together. Flatten dough out until it reaches finger thickness. Sprinkle with flour and let rest 5-10 minutes.
- Cut finger-width strips of dough and sprinkle strips with flour. Roll out each strip and cut ropes into 3/4-inch pieces. Separate slightly and flour well.
- Fresh gnocchi can sit at room temperature 30 minutes before cooking.
- To freeze: Place gnocchi on tray, making sure they aren’t touching. Once frozen, transfer to plastic freezer bag and freeze up to 2 months. Cook gnocchi from frozen and serve with desired sauce.
Photos courtesy of Getty Images
Source: Rouxbe


