A Fiesta Fusion of Worldwide Flavors
Family Features) If you’re seeking inspiration to take mealtime from bland and boring to new and vibrant, look no further than these at-home fiesta recipes. With options ranging from tongue-tingling spice to smooth, creamy and simply delicious, you can call on global flavors to bring life to your kitchen.
This menu from “The New York Times” bestselling cookbook author and recipe developer Stephanie Banyas offers delightful flavor fusions from around the world. The lively tastes of the Spicy Shrimp Remoulade in Lettuce Leaves and Mexican Style Paella with Chicken and Sausage pop with the high-quality ingredients of Fresh Cravings Salsas.
These boldly flavored salsas are made with vine-ripened tomatoes, crisp onions, zesty peppers and spices. Plus, they’re never cooked or pasteurized, meaning you’re enjoying a vibrant dip that’s never soggy or dull. Available in a range of heat levels among restaurant style, chunky and pico de gallo, they complement any at-home fiesta.
For a fiery, zesty twist, this Red Pepper Chickpea Soup with Gazpacho Relish and Tortilla Croutons calls for Fresh Cravings Hummus, as its ideal creamy texture and savory taste balances out the spice. Made with a short list of high-quality ingredients like chickpeas, tahini and Chilean extra-virgin olive oil, this hummus has a smooth, creamy mouthfeel.
“The hummus adds loads of flavor and makes this thick, rich soup totally dairy and gluten free, so there is no need for heavy cream, cornstarch or flour,” Banyas said. “It’s as beautiful to look at as it is delicious to eat.”
To find more fiesta-worthy recipe ideas, visit freshcravings.com.
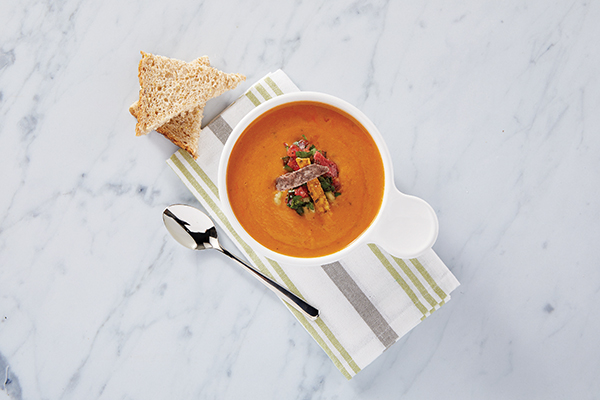
Red Pepper Chickpea Soup with Gazpacho Relish and Tortilla Croutons
Recipe courtesy of Stephanie Banyas
Servings: 2
- 1/4 cup finely diced seeded English cucumbers
- 1/4 cup finely diced seeded Roma tomato
- 2 tablespoons finely diced red onion
- 2 tablespoons finely chopped fresh cilantro leaves
- 1 lime, juice only, divided
- salt, to taste
- pepper, to taste
- 2 cups canned low-sodium vegetable stock, divided
- 1/2 cup Fresh Cravings Restaurant Style Salsa (mild or medium)
- 1 container (10 ounces) Fresh Cravings Roasted Red Pepper Hummus
- tri-color fried tortilla strips
- In small bowl, combine cucumber, tomato, onion and cilantro. Add half the lime juice and season with salt and pepper, to taste. Let sit at room temperature.
- In blender or food processor, process 1 cup stock and salsa until smooth.
- Pour mixture into medium saucepan. Add remaining stock and hummus, season with salt and pepper, to taste, and bring to boil over high heat. Reduce heat to medium-low and simmer until slightly thickened, about 15 minutes. Remove from heat and stir in remaining lime juice.
- Divide soup between two bowls and top with relish and tortilla strips.
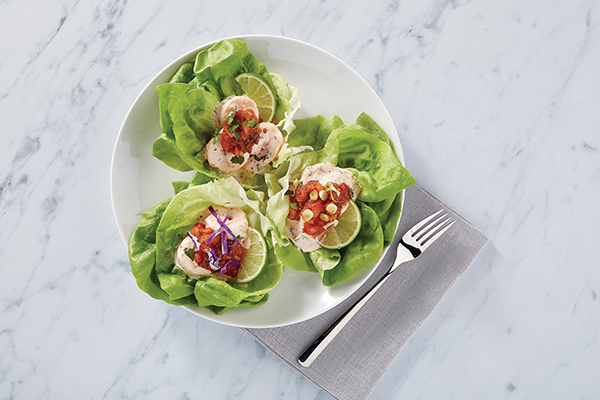
Spicy Shrimp Remoulade in Lettuce Leaves
Recipe courtesy of Stephanie Banyas
Yield: 8 leaves
Shrimp:
- 1/2 cup Fresh Cravings Chunky Salsa (mild or medium)
- 9 cups water, divided
- ice water
- 1 lime, sliced
- 12 sprigs cilantro
- 1 teaspoon kosher salt
- 1 pound fresh shrimp (31-35), peeled and deveined
Remoulade Sauce:
- 3/4 cup mayonnaise
- 1 tablespoon whole-grain mustard
- 2 teaspoons fresh lime juice
- 1/2 teaspoon chile powder or smoked paprika
- 1/2 teaspoon sugar
- 1/4 teaspoon salt
- 1/4 teaspoon black pepper
- 1/2 cup Fresh Cravings Chunky Salsa (mild or medium), drained well
- 1/4 cup chopped fresh cilantro leaves
- 1/4 cup green onion, thinly sliced, plus additional for garnish
- 8 butter or Boston lettuce leaves
- cilantro leaves, for garnish
- lime wedges, for garnish
- chopped black olives, for garnish (optional)
- chopped hard-cooked eggs, for garnish (optional)
- To make shrimp: In food processor or blender, blend salsa with 1 cup water until smooth.
- Fill large bowl with ice water; set aside. Transfer salsa mixture to large saucepan and add remaining water, lime slices, cilantro sprigs and salt. Bring to boil over high heat; stir in shrimp, cover, turn off heat and let shrimp poach off heat in liquid 10 minutes.
- Drain in colander. Transfer shrimp to ice bath and let sit 5 minutes. Drain again.
- To make remoulade sauce: In large bowl, whisk mayonnaise, mustard, lime juice, chile powder, sugar, salt and pepper until combined; fold in salsa.
- Put half of remoulade sauce in large bowl. Fold in shrimp and cilantro, adding remoulade as needed to make mixture creamier; taste for seasoning. Cover and refrigerate at least 30 minutes, or up to 6 hours.
- Arrange lettuce cups on platter. Spoon equal portions shrimp mixture into lettuce cups. Garnish with cilantro leaves; lime wedges; black olives, if desired; and eggs, if desired.
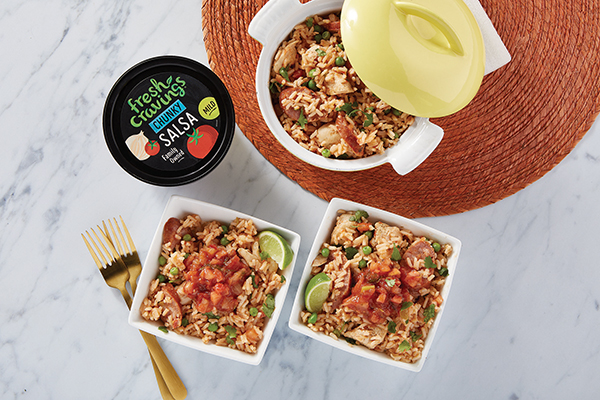
Mexican Style Paella with Chicken and Sausage
Recipe courtesy of Stephanie Banyas
Servings: 4-6
- 1 container (16 ounces) Fresh Cravings Chunky Salsa (mild or medium)
- 12 ounces chicken tenders, patted dry
- 1 teaspoon kosher salt, plus additional, to taste, divided
- freshly ground black pepper, to taste
- 3 tablespoons vegetable oil, divided
- 12 ounces fully cooked chicken sausage or pork sausage links
- 3 cups low-sodium canned chicken stock, water or combination
- 2 cups long-grain rice
- 1 cup frozen peas
- 1/4 cup chopped fresh cilantro or parsley
- lime wedges
- Remove 1/2 cup salsa and set aside. In blender or food processor, process remaining salsa until smooth.
- Put chicken in bowl, add 1/2 cup pureed salsa and toss to coat. Cover and marinate at least 30 minutes, or up to 2 hours in refrigerator.
- In large, high-sided saute pan over high heat, heat 2 tablespoons oil until it begins to shimmer. Season chicken with salt and pepper, to taste, and cook until both sides are golden brown and just cooked through, about 3 minutes per side. Remove to plate, loosely tent with foil and let rest 10 minutes then slice into 2-inch pieces.
- Add remaining oil to pan and heat until shimmering; cook sausage until golden brown on both sides, about 3 minutes per side. Remove to plate, loosely tent with foil and let rest 10 minutes. Slice on bias into 2-inch pieces.
- Wipe out pan with paper towels. Add remaining pureed salsa and stock; bring to boil. Add rice and 1 teaspoon salt. Bring mixture to boil, cover and reduce heat to medium-low; cook until liquid is absorbed and rice is tender, about 18 minutes.
- Remove from heat and sprinkle peas on top. Let sit, covered with lid, 5 minutes. Fluff with fork then stir in chicken, sausage, peas and cilantro. Spoon remaining salsa on top.
Source: Fresh Cravings
Whip Up a Bountiful Weekend Brunch
(Family Features) Fresh air, warm sun and delicious foods make brunch a favorite weekend event. Set the stage (and the table) for an inviting experience with recipes that cover all the bases from snacks and desserts to a mouthwatering main course.
Tide the appetite of your guests with Spiced Grass-Fed Lamb Over Hummus served with toasted flatbread or tortilla chips before dishing out Overnight Apple Cinnamon French Toast Casserole for a simple centerpiece. Just as those delectable dishes are vanishing, pull Brown Sugar Pound Cake out of the oven and pair with sweetened whipped cream and fresh fruit for a sweet finishing touch.
Visit Culinary.net to find more ways to broaden your brunch menu.
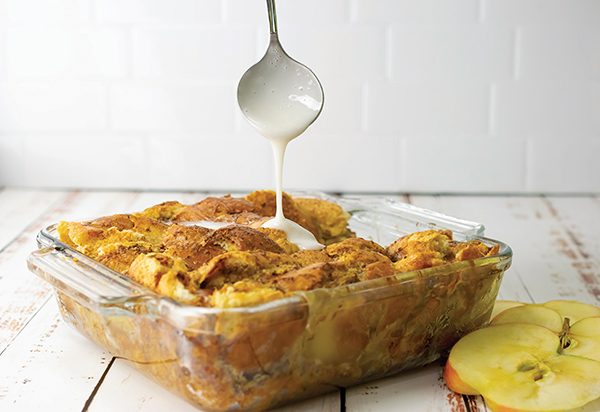
Wake Up to a Wonderful Brunch
Perfect for any brunch occasion is a delicious dish that can be made a day in advance, simplifying your morning prep before guests arrive with growling stomachs.
Prepared the day before and chilled overnight, this Overnight Apple Cinnamon French Toast Casserole is ready to bake to perfection in the morning with a gooey interior and crisp exterior filled with mouthwatering flavor. Drizzle with glaze then dish out to loved ones for a delicious way to make brunch easy.
Find more breakfast and brunch recipes at Culinary.net.
Overnight Apple Cinnamon French Toast Casserole
Servings: 12
- Nonstick cooking spray
- 1 package (20 ounces) French bread, cubed, divided
- 1 can (20 ounces) apple pie filling
- 9 eggs
- 1 cup half-and-half
- 2 teaspoons ground cinnamon
- 1 cup powdered sugar, plus additional (optional)
- 2 tablespoons milk, plus additional (optional)
- Spray 8-by-8-inch glass baking dish with nonstick cooking spray.
- In baking dish, add 10 ounces cubed French bread in bottom of dish. Pour apple filling over bread. Top with remaining cubed French bread. Set aside.
- In medium bowl, whisk eggs, half-and-half and cinnamon. Pour evenly over bread.
- Cover with aluminum foil and chill overnight.
- Heat oven to 325 F.
- Remove foil and bake 50-60 minutes.
- Let cool 10-15 minutes.
- In small bowl, whisk powdered sugar and milk. Add additional, if needed, until pourable glaze is reached. Drizzle over casserole before serving.
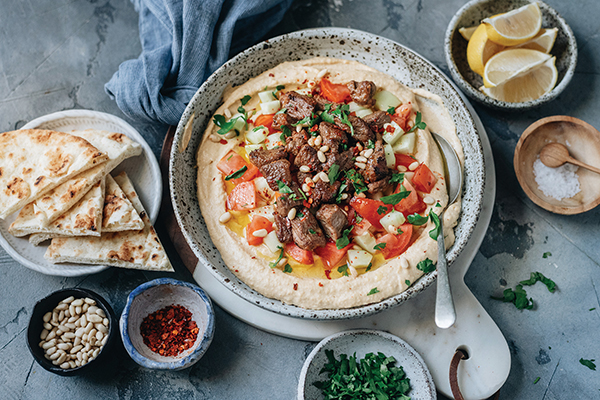
A Fresh, Flavorful Brunch Bite
Brunch is a perfect opportunity to entertain friends and family with delicious recipes that will delight their taste buds. For example, this smooth hummus is paired with tender New Zealand grass-fed lamb loin chops and fresh toppings for flavor in every bite.
Ready in less than 30 minutes, this Spiced Grass-Fed Lamb Over Hummus recipe is made using Atkins Ranch lamb, which is available at your local Whole Foods Market and hails from New Zealand where the animals are grass-fed 365 days a year and allowed to roam and graze freely over lush green hills and pastures. The result is a lean, finely textured, flavorful meat that tastes just as nature intended.
Visit beefandlambnz.com for more recipes, cooking tips and information.
Spiced Grass-Fed Lamb Over Hummus
Prep time: 15 minutes
Cook time: 5 minutes
Servings: 4-6
Lamb:
- 4 Atkins Ranch grass-fed lamb loin chops
- 1 teaspoon cumin powder
- 1/4 teaspoon salt
- 1 tablespoon extra-virgin olive oil
Hummus:
- 1 can (15 ounces) chickpeas
- 3 cloves garlic, chopped
- 1/4 cup tahini
- 3 tablespoons fresh lemon juice
- 1/2 teaspoon salt
- 1/2 teaspoon cumin
- 1/2 teaspoon paprika
- 3 tablespoons olive oil
For serving:
- 1 Persian cucumber, small diced
- 1 small tomato, diced
- 2 tablespoons roasted pine nuts (or 2 tablespoons pomegranate seeds)
- parsley, chopped
- lemon wedges
- toasted flatbread or tortilla chips
- To make lamb: Remove lamb from bone, dice meat into small cubes and transfer to medium bowl.
- Add cumin powder and salt. Toss to coat. Marinate while preparing hummus.
- To make hummus: Drain chickpeas, reserving 1 tablespoon liquid. Rinse chickpeas under running water then drain.
- In bowl of food processor, pulse chickpeas, chickpea liquid and garlic until chickpeas and garlic are chopped.
- Add tahini, lemon juice, salt, cumin, paprika and olive oil. Mix until smooth paste forms. Taste and adjust by adding more salt, lemon juice or olive oil, as desired.
- Transfer hummus to large platter and spread it out.
- In large skillet, heat extra-virgin olive oil over high heat until hot. Add lamb and cook 30 seconds without moving.
- Turn lamb over and cook 30-60 seconds, repeating until all sides are browned. Remove from pan and let rest 5 minutes.
- To serve, place cucumbers and tomatoes in well of hummus then top with lamb, pine nuts and parsley.
- Top with squeeze of lemon juice and serve with flatbread or tortilla chips.
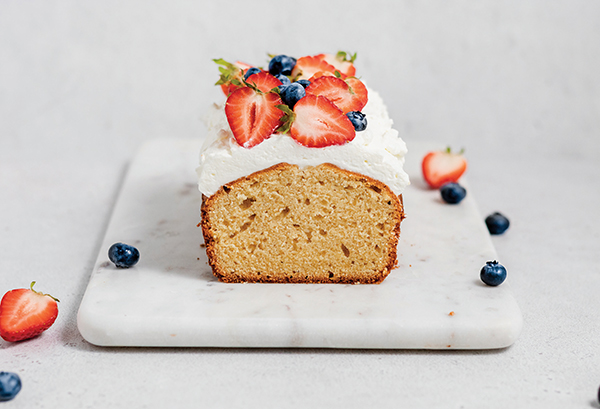
Satisfy Cake Cravings with a Brunch-Worthy Dessert
Whether your brunch feast consists of bacon and eggs, pancakes and waffles or a combination of favorites, you can cap it off with a sweet treat for the perfect ending. After all, no celebration is complete without dessert.
Once the table is cleared of the main courses, dish out decadent bites of this Brown Sugar Pound Cake baked with high-quality ingredients like C&H Sugars to end the meal on a sweet note. Top with whipped cream and your crowd's favorite fruits like strawberries and blueberries or serve the toppings separately for a customizable treat.
Visit chsugar.com for more brunch recipe ideas.
Brown Sugar Pound Cake
Prep time: 20 minutes
Cook time: 1 hour
Servings: 8
- 1 3/4 cups all-purpose flour, plus additional for coating pan, divided
- 1 cup packed C&H Light Brown Sugar
- 1 cup (2 sticks) butter, softened
- 4 eggs
- 1 teaspoon vanilla extract
- 1/2 teaspoon baking powder
- 1/4 teaspoon salt
- sweetened whipped cream, for topping (optional)
- fresh fruit, such as strawberries and blueberries, for topping (optional)
- Preheat oven to 350 F.
- Grease and flour 9-by-5-by-3-inch loaf pan. In large bowl, beat sugar and butter until fluffy. Beat in eggs one at a time. Add vanilla. In separate bowl, combine 1 3/4 cups flour, baking powder and salt. Gradually add to sugar mixture. Pour batter into pan.
- Bake 1 hour, or until toothpick inserted in center comes out clean. Remove from pan and turn out on rack to cool completely.
- Top with sweetened whipped cream and fresh fruit, if desired.
Source: C&H Sugar
Beef + Lamb New Zealand
5 Steps for Mastering Family Meal Planning
(Family Features) As you and your family embark on a mission to create delicious, nutritious meals all while saving money, it’s key to remember meal planning is essential for success. From tracking a list of ingredients you’ll need to noting your loved ones’ favorite foods, there are some easy steps you can take to make dinners at home enjoyable and budget friendly.
Getting on track with your own plan can start with these tips from Healthy Family Project’s Mission for Nutrition, which aims to help families find weekly meal success with an internationally inspired e-cookbook including grocery lists, recipe ideas and cooking hacks.
Work together. Before heading to the store or heating up the oven, sit down with your loved ones and make a list of easy-to-make recipes you all enjoy. Each time you discover a new favorite, add it to the list so you’ll have a reference guide when it’s time to plan a week’s worth of meals.
Stick to a schedule. Set a day and time each week your family can meet and plan out dinners. This also offers an opportunity to bring to light any newfound favorites or fresh ideas while bringing everyone to the same room for quality time together.
Plan time-saving processes. Think ahead while planning meals and consider the equipment you’ll need. Saving time while cooking can be as easy as sticking to recipes that call for hands-off appliances like a slow cooker or pressure cooker and using a food processor rather than a knife and cutting board.
Schedule a “leftovers night.” When you prep dinners that call for crossover ingredients, it’s easier to turn one meal into two. For example, buying sweet onions and chicken breast to make Chicken Apple Enchiladas means you’ll have those ingredients on hand for Greek Chicken Bowls later in the week.
Make a list. Once you’ve decided on recipes for the week, create a list of all the ingredients you’ll need. While you’re at the store, stick to your plan and avoid impulse buys to help stay on track while getting in and out quicker.
Find more recipes and meal planning tips by downloading the free e-cookbook at healthyfamilyproject.com/mission-for-nutrition and join the conversation by following #missionfornutrition on social media.
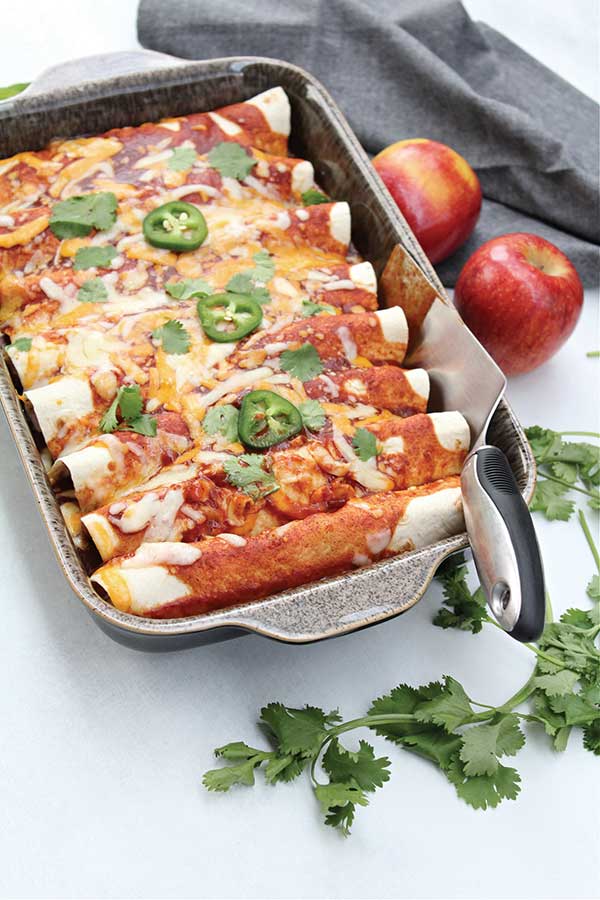
Chicken Apple Enchiladas
Recipe courtesy of Healthy Family Project's Mission for Nutrition
- 1/2 sweet onion, diced
- 1 jalapeno, diced
- 1 Envy or Jazz apple, diced
- 2 cups cooked shredded chicken
- 8 flour tortillas
- 6 ounces shredded Mexican blend cheese, divided
- 1 can red enchilada sauce
- cilantro (optional)
- Heat oven to 350 F.
- In skillet, cook onions until translucent. Add jalapeno and apple; saute 2-3 minutes.
- Add cooked chicken and mix well. Remove from heat.
- Lay out tortillas and sprinkle cheese on each. Add chicken mixture and roll. Place in baking dish and cover with enchilada sauce.
- Bake 20 minutes, or until heated throughout.
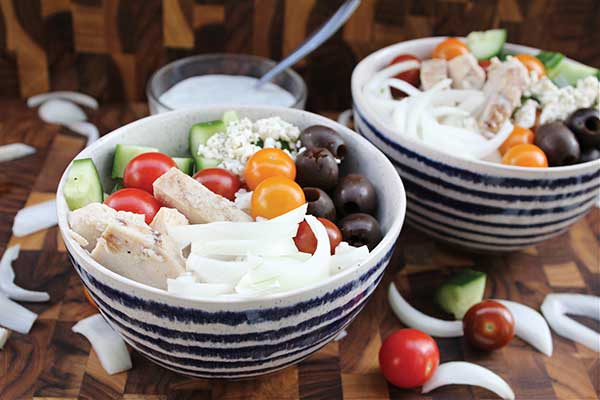
Greek Chicken Bowls
Recipe courtesy of Healthy Family Project's Mission for Nutrition
- 1 cup cooked white or brown rice
- 1 grilled chicken breast, sliced
- 1 RealSweet onion, sliced
- 1 cup cherry tomatoes
- 1 cucumber, cut into quarters
- 1/2 cup black olives
- 1 tablespoon feta cheese
- 2 tablespoons tzatziki sauce
- Place cooked rice and chicken in bowls.
- Top each bowl with sweet onions, tomatoes, cucumbers and black olives. Sprinkle each with feta cheese. Drizzle each with tzatziki sauce.
Source: Healthy Family Project
St. Patrick's Day Sandwiches
(Culinary.net) Freshen up your St. Patrick’s Day menu with easy, light sandwiches inspired by the traditional color of the festivities. These open-faced noshes can be perfect for lunch, snack time or even as an appetizer for get-togethers with friends and family.
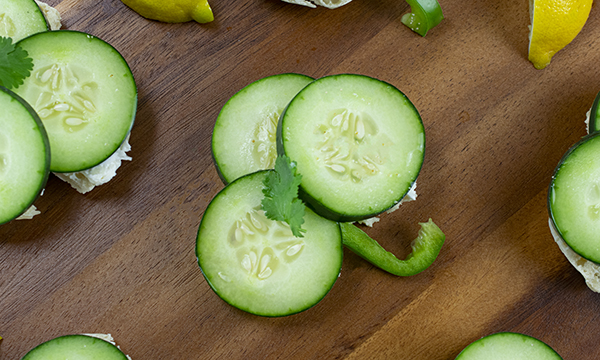
Layered with a smooth cream cheese and mozzarella mixture then topped with crisp cucumber and a stem of green bell pepper, these St. Patrick’s Day Sandwiches are easy and cute, which makes them a fan favorite at nearly any green gathering. They’re also sprinkled with lemon juice to add a little acidity and create a nice, light bite.
Plus, this recipe is quick to make. When you’re in a rush to get everything on the table for the party, it’s easy to throw together and get on the platter in next to no time.
The sandwiches pop off the plate with their bright, seasonal garnishes. While sure to attract attention and have your loved ones asking “Where did you get this idea?” they’re also an easy way to sneak a few vegetables into your kids’ diets.
For more festive recipes and ideas at Culinary.net.
Watch video to see how to make this recipe!
St. Patrick’s Day Sandwiches
Yield: 8 sandwiches
- 8 ounces plain cream cheese spread, softened
- 1 cup finely shredded mozzarella cheese
- salt
- 4 English muffins
- 24 slices cucumber
- 8 thin slices green pepper
- fresh cilantro leaves
- lemon juice
- lemon slices, for garnish (optional)
- In bowl, mix cream cheese spread, mozzarella cheese and salt well.
- Split English muffins in half. Cut each muffin half into shamrock shape.
- Spread cheese mixture over each muffin half.
- Place three cucumbers on each “shamrock,” one on each “leaf.” Use green pepper slice as stem. Place cilantro leaf on top of each sandwich.
- Sprinkle sandwiches with lemon juice and add lemon slices, for garnish, if desired.
Source: Culinary.net
Build a Better-for-You Menu in 2022
(Family Features) Committing to healthier habits in the new year often starts in the kitchen. Adding better-for-you recipes to your arsenal is the start of a more nutrition-focused lifestyle, and whether you’re a true home chef or just learning the basics, these dishes can be the gateway to a healthier you.
From fresh spins on family night and quick solutions in a pinch to homemade lunches and satisfying salads, consider these delicious and nutritious ways to enhance your homemade meals in 2022.
Visit Culinary.net to find more health-conscious recipe ideas.
A Fresh Take on Family Dinner
If your family gets stuck in a dinner routine rut, it can feel like you’re eating the same recipes over and over again.
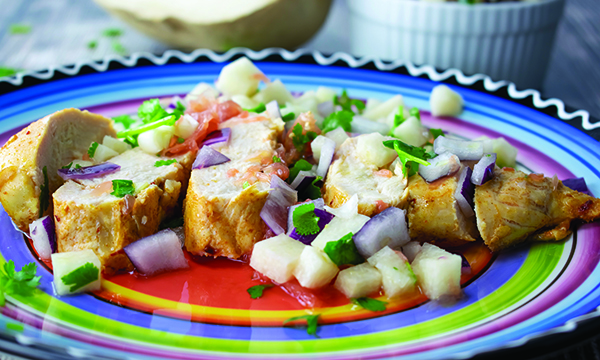
However, this fresh and unique recipe for Cuban Chicken with Salsa Fresca might inspire you to think outside the culinary box and give your family members the satisfactory flavor they desire at dinnertime. With fresh ingredients and a wholesome flavor, this meal is perfect to add to your menu.
Find more recipes and family dinner ideas at Culinary.net.
Cuban Chicken with Salsa Fresca
Servings: 5
- 1 cup grapefruit juice
- 2 tablespoons olive oil
- 2 teaspoons garlic powder
- 2 teaspoons cumin
- 2 teaspoons paprika
- 1 teaspoon crushed red pepper
- 1 1/4 pounds boneless, skinless chicken breasts
Salsa Fresca:
- 1 cup grapefruit segments
- 1/2 jicama, cubed
- 1/2 red onion, chopped
- 3/4 cup grapefruit juice
- 4 tablespoons olive oil
- 1/2 cup fresh cilantro, chopped
- 1 jalapeno pepper, chopped
- Heat oven to 400 F.
- In large bowl, mix grapefruit juice, oil, garlic powder, cumin, paprika and red pepper until combined. Add chicken to bowl and turn to coat. Refrigerate 30 minutes or longer.
- To make salsa fresca: In medium bowl, mix grapefruit segments, jicama, red onion, grapefruit juice, olive oil, cilantro and jalapeno pepper until combined. Refrigerate until ready to serve.
- Remove chicken from marinade. Place chicken in baking dish. Bake 25-30 minutes until chicken is cooked through.
- Serve chicken with salsa fresca.
Take Your Salad from Bland to Bold
Step aside, boring salads. A new year and a healthier eating plan can include better-for-you greens and dressings that hit the spot.
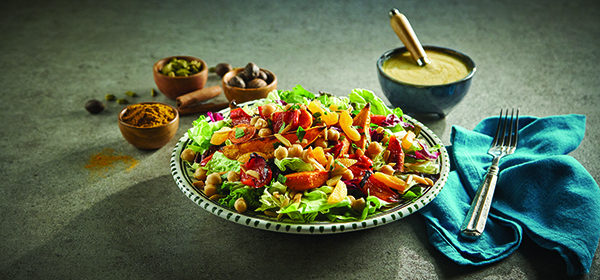
Veggies roasted with aromatic spices served on Fresh Express 5-Lettuce Mix are drizzled with lemon tahini dressing in this Moroccan Roasted Vegetable Salad, a delicious vegetarian way to turn a bland meal into a bona fide delight. With green leaf lettuce, red leaf lettuce, butter lettuce, romaine and radicchio, the mix of greens offers a bold combination of textures and flavors for those who love variety and color.
Find more ways to enhance your at-home salads at FreshExpress.com.
Moroccan Roasted Vegetable Salad
Prep time: 20 minutes
Cook time: 20 minutes
Servings: 4
Lemon Tahini Dressing:
- 1/4 cup tahini
- 1/4 cup olive oil
- 3 tablespoons lemon juice
- 3 teaspoons maple syrup
- 2 teaspoons Dijon mustard
- 1/4 teaspoon salt
- 2 tablespoons cold water
- nonstick cooking spray
- 6 tablespoons olive oil
- 2 teaspoons ras el hanout or garam masala
- 1/2 teaspoon salt
- 1/4 teaspoon pepper
- 4 sweet potatoes, peeled and cut into long wedges
- 4 whole large carrots, chopped
- 2 red bell peppers, cored and cut into 1-inch pieces
- 2 packages (6 ounces each) Fresh Express 5-Lettuce Mix
- 1 can (15 1/2 ounces) chickpeas, rinsed and drained
- 1/3 cup dried apricots, sliced
- 1/3 cup slivered almonds, toasted
- 2 tablespoons Italian parsley, chopped
- To make lemon tahini dressing: In small bowl, whisk tahini, olive oil, lemon juice, maple syrup, Dijon mustard and salt. Add cold water; mix well. If dressing thickens, mix in more cold water.
- Heat oven to 400 F. Spray two baking sheets with nonstick cooking spray.
- In large bowl, mix olive oil, ras el hanout, salt and pepper. Add sweet potatoes; toss to coat. Transfer to first prepared baking sheet. Add carrots and peppers to leftover oil; toss to coat. Transfer to second prepared baking sheet. Bake 15-20 minutes, or until vegetables are tender. Let cool.
- Arrange lettuce mix on four plates. Top each with sweet potatoes, carrots, red pepper, chickpeas, apricots and almonds. Drizzle with dressing and sprinkle with parsley.
A Lean, Nutritious Lunch
Meal prepping is one of the most common strategies for improving eating habits, however, this tactic is often focused primarily on nutritious breakfasts and family dinners. Don’t let lunch go by the wayside; you can skip the fast food breaks by opting for a recipe you can make quickly at home.
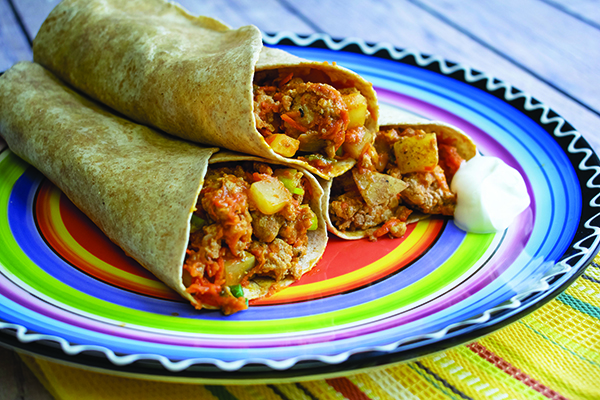
Made with nutritious Wisconsin Potatoes loaded with goodness, low in calories, high in fiber and a good source of vitamin B6, potassium, vitamin C and antioxidants, a Turkey-Potato Wrap provides a simple solution for swapping out saltier foods for a lean lunch. By making four at a time in just half an hour, lunch is served for most of your work week to help save time on busy mornings while adding vitamins, nutrients and antioxidants to your afternoon meal.
Find more better-for-you recipe ideas at eatwisconsinpotatoes.com.
Turkey-Potato Wrap
Recipe courtesy of Wisconsin Potatoes
- 3/4 pound Wisconsin russet potatoes, cut into 1/2-inch pieces
- 1 tablespoon water
- 1 tablespoon canola oil
- 3/4 pound ground lean turkey
- 1 large carrot, shredded
- 1/3 cup sliced green onions with tops
- 1 can (8 ounces) tomato sauce
- 2/3 cup shredded cheddar cheese
- 1 teaspoon dried Italian seasoning or basil
- salt, to taste
- pepper, to taste
- 4 large whole-wheat or high-fiber tortillas
- light sour cream (optional)
- Place potatoes in microwave-safe bowl; sprinkle with water. Cover, venting one corner. Microwave on high 5-8 minutes until potatoes are tender.
- In large nonstick skillet over medium-high heat, heat oil. Add and break up turkey; cook 5 minutes, tossing occasionally. Mix in carrot; cook 2 minutes. Add potatoes and onions; toss and cook 2 minutes. Reduce heat to medium; mix in tomato sauce, cheese and Italian seasoning.
- Cook, stirring occasionally, 4-5 minutes until mixture is hot and most sauce is absorbed. Season with salt and pepper, to taste. On work surface, lay out tortillas. Place 3/4 cup hot turkey mixture on each; fold and roll for burritos.
- Cut in halves. Serve each with sour cream, if desired.
- Eating Well When You’re Short on Time
- Committing to a better eating plan doesn’t change the fact there are simply times when a hectic schedule calls for a quick solution.
- When you need an easy-to-make lunch or dinner, opt for this Loaded Smoked Salmon Rice Bowl that takes just 5 minutes for a satisfying meal. With Minute’s fully cooked Ready to Serve Brown Rice, it’s easy to add whole grains to your diet even when you’re short on time. One cup of cooked brown rice is equal to two servings of whole grains, making it a nutritious option when time is of the essence.
- Packaged in convenient, single-serve, BPA-free cups, the brown rice cups provide a quick, easy solution for dishes from breakfast to dessert. Ready in just 1 minute, they’re non-GMO, gluten free and cholesterol free with no preservatives.
Find more easy-to-assemble recipes at MinuteRice.com.
Eating Well When You’re Short on Time
Committing to a better eating plan doesn’t change the fact there are simply times when a hectic schedule calls for a quick solution.
When you need an easy-to-make lunch or dinner, opt for this Loaded Smoked Salmon Rice Bowl that takes just 5 minutes for a satisfying meal. With Minute’s fully cooked Ready to Serve Brown Rice, it’s easy to add whole grains to your diet even when you’re short on time. One cup of cooked brown rice is equal to two servings of whole grains, making it a nutritious option when time is of the essence.
Packaged in convenient, single-serve, BPA-free cups, the brown rice cups provide a quick, easy solution for dishes from breakfast to dessert. Ready in just 1 minute, they’re non-GMO, gluten free and cholesterol free with no preservatives.
Find more easy-to-assemble recipes at MinuteRice.com.
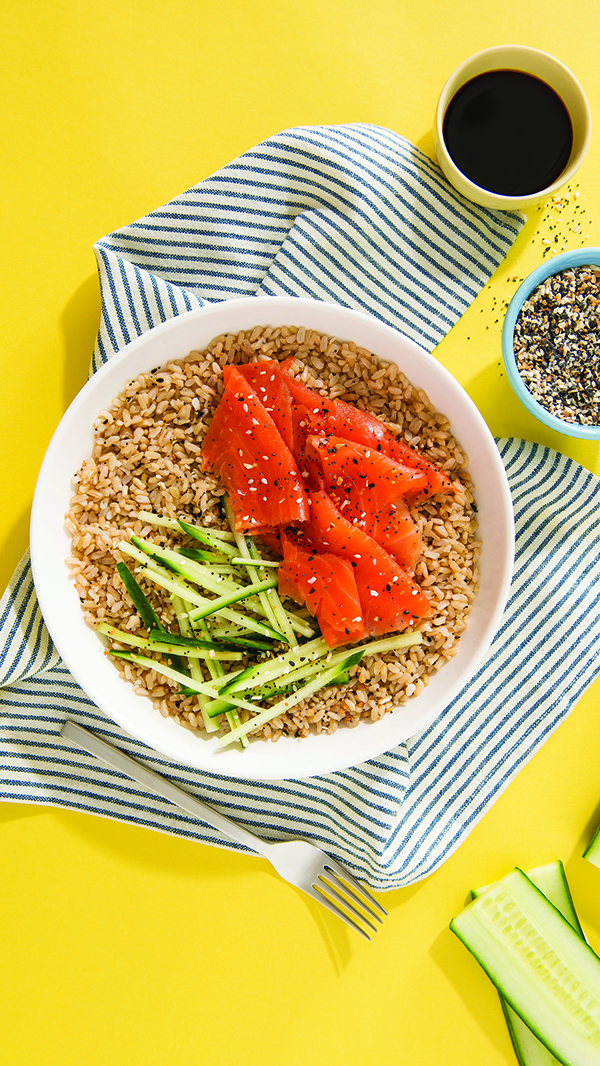
Loaded Smoked Salmon Rice Bowl
Prep time: 4 minutes
Cook time: 1 minute
Servings: 1
- 1 cup Minute Ready to Serve Brown Rice
- 2 ounces smoked salmon
- 1/2 cup julienned cucumber
- 1 teaspoon soy sauce
- 1 tablespoon everything bagel seasoning mix
- Heat rice according to package directions.
- Top rice with smoked salmon and cucumbers. Drizzle with soy sauce and sprinkle with seasoning mix.
Holiday Entertaining is Back with Sweet, Savory and Oh So Cheesy Ideas
Real California Milk helps impress guests with the California Cheese Centerpiece and Cookie Exchange Board
(Family Features) This holiday season, entertaining is back on the table and that means endless opportunities to showcase Instagram-worthy ideas. For those looking to impress friends and family, Real California Milk has two unique culinary ideas to take holiday traditions to the next level: The Cheese Centerpiece and Cookie Exchange Board. From fresh food as bountiful décor to camera-ready cookie presentations, incorporating California dairy into your entertaining is a winning holiday strategy.
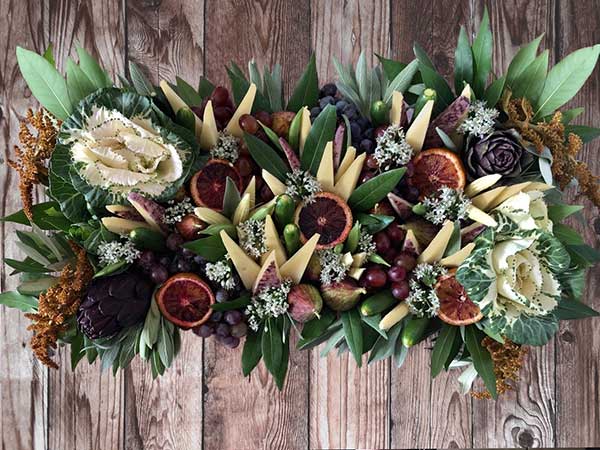
California Cheese Centerpiece
The mission? Create a holiday centerpiece but make it delicious. Real California Milk partner Jessica Lawrenz, Founder of Monger, Mold and Milk, took the challenge with the California Cheese Centerpiece, the ultimate in edible entertaining with a beautiful display of Real California Cheeses, salami, fruits and vegetables arranged with fragrant herbal garnishes in a display sure to impress family and friends. As a bonus, it creates less waste than a stand-alone floral bouquet (and you’ll have less to clean up!).
Find additional cheese displays and holiday recipes at realcaliforniamilk.com.
INGREDIENTS:
Variety of firm to medium (semi-firm) Real California Cheeses (find them here: https://www.realcaliforniamilk.com/cheese-makers)
Shown in arrangement:
- Real California Dry Jack cheese wedges
- Real California Wine-soaked Cheddar wedges
- Real California Triple Cream cheese wedges
- Salumi or salami, made into roses
Fresh fruits and vegetables:
- Mini clementines or kumquats
- Grapes or currants (both shown)
- Fresh figs
- Gooseberries
- Cucamelons or mini cucumbers
- Cherry tomatoes (tiger stripe tomatoes shown but any small tomato works)
Garnishes:
- Bay leaf stems
- Olive leaf stems
- Rosemary branches
- Lavender stems
- Sage bunches
- Chive or garlic flowers or any edible flower with a stem
Tools and Materials:
- Circular tray or plate
- Craft or flora foam (half sphere shape that is at least 1-inch smaller in diameter than your tray)
- Double-sided tape
- Plastic wrap
- Toothpicks, U-shape bamboo toothpicks (optional)
- Cookie cutter shapes (optional)
DIRECTIONS:
- Cover foam in plastic wrap to protect food from making contact with the foam.
- Use double-sided tape to secure the foam to the tray.
- Now you can start assembling the centerpiece. Start from the bottom and work your way up to the top of the sphere.
- Use the bulk of your leafy garnishment (bay leaf stems, olive leaf stems, sage bunches) on the bottom layer to create a base and coverage by poking the stems into the foam. If needed you can trim the bottom of the stem in a diagonal direction to create a more pokey end OR use a toothpick to pierce a hole in the place where you want to insert stems.
- For best visual appeal, fruits like grapes and currants should be arranged to kind of flow over the edge of the tray near the bottom as well. PRO TIP: Use “U” shaped bamboo toothpicks to secure the stems of the hanging fruits into the foam.
- From here use toothpicks to secure cheese wedges, salumi roses, fruits and vegetables into the foam. Cut shorter, triangular pieces of cheese (as opposed to longer triangular pieces used for a long/rectangular centerpiece). Use any tall wedges near the bottom where they will be easy to grab but not sticking out too far if placed near the top. You can use cookie cutter shapes as well for the cheeses, if desired.
- Finally, take any of the smaller garnish pieces you have (lavender, chive flowers, rosemary ends, loose leaves) to fill in the spaces between all the items.

Holiday Cookie Exchange Board
If a cookie exchange is on the docket for this year’s holiday or you’re simply looking to upgrade your dessert table, take some tips from this stunning cookie exchange presentation. Mix and match Real California Milk cookie recipes to create a mouthwatering arrangement and decorate with mini candy canes, holiday lollipops, various holiday décor and lights. Add napkins, cookie bags for take-away, and recipe cards for sharing, and let your guests go to town.
- Hot cocoa or coffee
- Milk shooters
- Coconut Walnut Cake Bars
- Chocolate Mint Cookies
- Stroopwafel Cookies
- Mini Gingerbread Cupcakes
- Madeleines
Dipped in melted dark chocolate and rolled in crushed peppermint candies or Holiday sprinkles
Leave out ice cream, exchange holiday sprinkles for rainbow sprinkles, and dip in melted white chocolate with color for extra festivity
California is the nation’s leading milk producer and is responsible for producing more butter, ice cream and nonfat dry milk than any other state. The state is the second-largest producer of cheese and yogurt. California milk and dairy foods can be identified by the Real California Milk seal, which certifies they are made exclusively with milk from the state’s dairy farm families.
About Real California Milk/California Milk Advisory Board
The California Milk Advisory Board (CMAB), an instrumentality of the California Department of Food and Agriculture, is funded by the state’s dairy farm families who lead the nation in sustainable dairy farming practices. With a vision to nourish the world with the wholesome goodness of Real California Milk, the CMAB’s programs focus on increasing demand for California’s sustainable dairy products in the state, across the U.S. and around the world through advertising, public relations, research, and retail and foodservice promotional programs. For more information and to connect with the CMAB, visit RealCaliforniaMilk.com, Facebook, YouTube, Twitter, Instagram and Pinterest.
Source: Real California Milk
Plan a Perfect Reunion for Family and Friends
(Family Features) After an extended period of social distancing, this year will be a time for reuniting with family and friends. Picnic get-togethers filled with delicious food are one of the best ways to reunite with loved ones when you’re ready for those long-overdue laughs.
While planning the perfect outdoor gathering can feel overwhelming, it doesn’t have to be. With these simple tips, it can be easy to organize a memorable picnic reunion.
Make it fun. Whether it’s a water balloon toss or a three-legged race, organizing a few games for your guests can be a simple way to reconnect and have fun together. Outdoor games like ring toss and potato sack races or arts and crafts are activities all ages can enjoy.
Reach for pantry staples. No picnic is complete without good food. When planning your menu and packing your cooler, don’t stress. Before you make an extra trip to your local farmers market or grocery store, be sure to check your pantry. You probably already have the makings for simple yet delicious meals and snacks. For example, canned fruits, vegetables and proteins – like wild-caught tuna, salmon and sardines – can help you create and elevate your picnic recipes.
Host an eco-friendly picnic. Good food and good weather help make a successful picnic, but ensuring you leave your space as you found it is equally important. To minimize waste, invest in reusable picnicware, like utensils and plates. Also consider swapping your paper napkins for cloth versions. Not only are they more environmentally friendly, but they’ll also elevate the overall look of your picnic.
No grill, no problem. As more people seek out substitutes for red meat, change up your menu and serve seafood as a delicious alternative. For example, an Albacore Bliss Bowl made with Chicken of the Sea Solid White Albacore Tuna in Water is a versatile choice that can be topped with veggies like cabbage, cucumber and carrot then drizzled with a homemade dressing. Since there’s no cooking required, you can easily prep ahead of time or even on-site. For those taking part in the day’s games and activities, try these Salmon Rollups which make perfect handheld snacks.
For more recipe inspiration while planning your next picnic reunion, visit chickenofthesea.com .
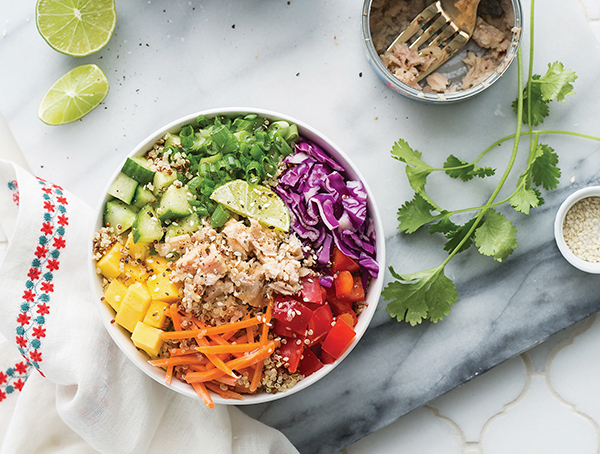
Albacore Bliss Bowl
Total time: 10 minutes
Servings: 4
- 2 cans (5 ounces each) Chicken of the Sea Solid White Albacore Tuna in Water, drained and flaked
- 2 cups cooked quinoa
- 1/2 cup chopped purple cabbage
- 1/3 cup diced cucumber
- 1/3 cup shredded carrot
- 1/3 cup diced red pepper
- 1/3 cup diced mango
- 1/3 cup chopped green onions
- 4 tablespoons apple cider vinegar
- 2 tablespoons olive oil
- 2 tablespoons honey
- 1 tablespoon sesame oil
- 1/2 teaspoon salt
- 1/2 teaspoon freshly ground pepper
- 1 teaspoon sesame seeds or black sesame seeds
- Divide cooked quinoa between four bowls. Top each with evenly divided tuna, cabbage, cucumber, carrots, red peppers, mango and green onions.
- In small bowl, whisk apple cider vinegar, olive oil, honey, sesame oil, salt and pepper. Drizzle over each bowl. Garnish with sesame seeds.
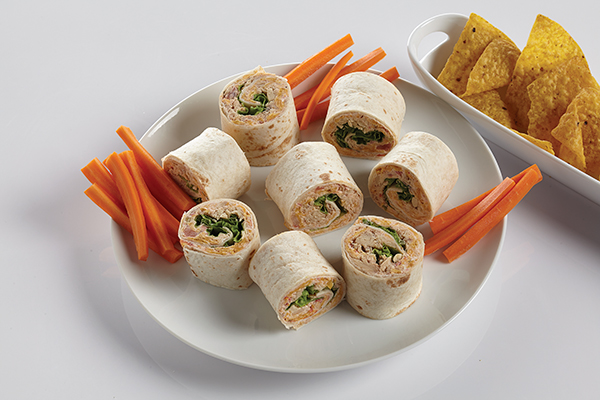
Salmon Rollups
Total time: 15 minutes
Servings: 4
- 1 can (5 ounce) Chicken of the Sea Pink Salmon
- 1 package (8 ounces) cream cheese, softened
- 1/2 cup thick and chunky salsa, plus additional for dipping (optional)
- 1 cup shredded cheddar cheese
- 1 cup corn chips, crushed
- 4 flour tortillas (8 inches)
- 4 large leafy green lettuce leaves, washed and patted dry
- In bowl, combine cream cheese and 1/2 cup salsa until light and fluffy. Stir in salmon, cheese and corn chips.
- Spread 1/4 filling to within 1/2 inch of each tortilla edge. Arrange one lettuce leaf over filling. Roll up tortillas and wrap in plastic wrap. Refrigerate 1-3 hours.
- To serve, remove plastic wrap, trim ends from rolls and cut each into 3-4 slices. Serve with additional salsa, if desired.
Source: Chicken of the Sea
Kids Charcuterie Snack Board
(Family Features) Summer sun means it’s time for warm-weather fun for kids of all ages, and all that activity and playing calls for snacks and hydration to recharge. Whether your children like to play poolside or take a bicycle adventure through the neighborhood, the right nutrient-dense foods can keep the fun going all day long.
For an option that quenches hunger (and thirst) without sacrificing nutrition, try an assortment of ways to enjoy watermelon. As a refreshing ingredient or standalone treat, watermelon includes just 80 calories and no fat while providing an excellent source of vitamin C (25%) and higher levels of lycopene (12.7 mg per 2-cup serving) – an antioxidant being studied for its role in sun protection – than any other fresh fruit or vegetable. Plus, it’s made of 92% water, meaning it’s a flavorful way to encourage kids to rehydrate during some fun in the sun.
Make watermelon part of a balanced snack plate with this Kids Charcuterie Snack Board including assorted watermelon, peanut butter and jelly sandwiches, sliced veggies, sliced fruits, crackers, pretzels and more. In addition to the nutritional benefits, the simplicity of this snack means children can help assemble it while showing off their creativity.
Visit watermelon.org to find more kid-friendly recipe ideas.
Watch video to see how to make this recipe!
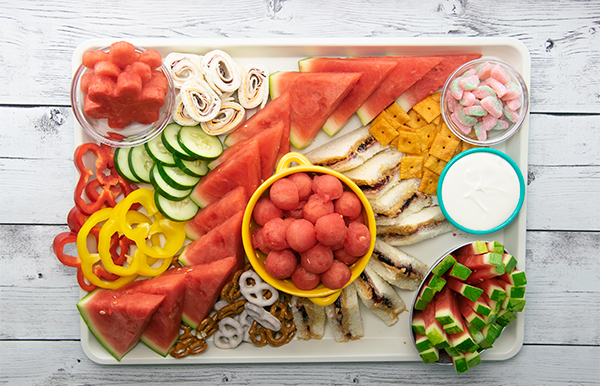
Kids Charcuterie Snack Board
Recipe courtesy of the National Watermelon Promotion Board
- Cubed watermelon
- watermelon balls, skewered
- watermelon wedges
- watermelon sticks
- flower-shaped watermelon cutouts
- peanut butter and jelly sandwiches, halved
- ham and cheese pinwheels
- sliced veggies, such as cucumbers, carrots, sweet peppers and celery
- sliced fruit
- pretzels
- crackers
- small bowl of candy (optional)
- Prepare watermelon, sandwiches, pinwheels, veggies, fruit, pretzels, crackers and candy, if desired.
- On large board or platter, arrange all ingredients.
Add Mediterranean Flair to Your Dinner Table
(Family Features) During the past year, many people have missed the opportunity to travel and experience the sights, sounds and tastes of the world, but it’s easy to explore other cultures and cuisines by experimenting in the kitchen.
If you’re looking to transport your taste buds to the shores of Spain or the beaches of Greece, one of the best places to start is with the Mediterranean Diet. Renowned chef Geoffrey Zakarian recommends these tips to help home cooks elevate their dishes and easily incorporate the popular diet into everyday cooking.
Reach for Pantry Staples. There’s no single definition of the Mediterranean Diet, but it’s high in vegetables, fruits, whole grains, nuts, seeds, olive oil and seafood. By keeping your pantry stocked with canned versions of ingredients like beans and fish you can easily add them to your favorite dishes. Yellowfin Tuna Pasta Salad with Arugula Pesto and Dates, and Tuna Aioli Dip with Balsamic Drizzle are flavorful ways to bring Mediterranean flair to your dinner table.
Add Seafood. Eating more seafood is one of the leading principles of the Mediterranean Diet. Tuna salad is one tried-and-true dish that can help incorporate fish into your menu. To make it more nutritious, opt for tuna that’s packed in extra-virgin olive oil, so you don’t have to add much mayo to the base. For example, Genova Premium Tuna provides a tasteful addition to recipes and is high in protein, a great source of omega-3s and has a uniquely rich and savory flavor that offers a taste of the Mediterranean in every bite.
Visit GenovaSeafood.com for more recipe inspiration.
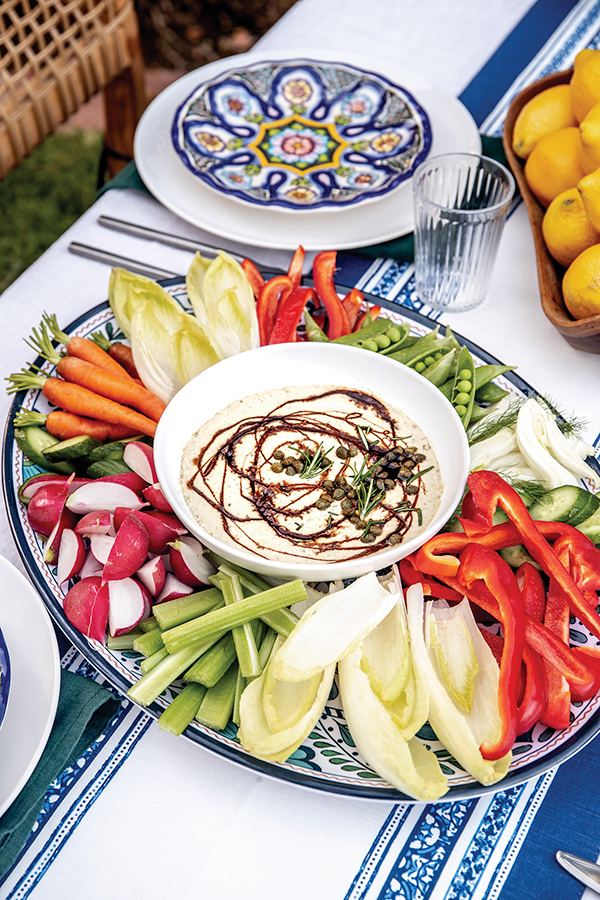
Tuna Aioli Dip with Balsamic Drizzle
Prep time: 15-20 minutes
Cook time: 10-15 minutes
Servings: 4
- 6 ounces Genova Albacore Tuna in Olive Oil
- 1/4 cup balsamic vinegar
- 1 dried bay leaf
- 1 sprig fresh rosemary
- 1⁄3 cup mayonnaise
- 2 tablespoons capers, drained
- 2 anchovies
- 1/2 lemon, juice only (about 1 1/2 tablespoons)
- raw vegetables, such as carrots, celery, cucumber spears, endive leaves, sliced fennel and bell pepper strips, for dipping
- Drain tuna, reserving 2 tablespoons oil.
- In small saucepan, combine balsamic vinegar, bay leaf and rosemary sprig. Bring to boil and reduce until syrupy, about 1 tablespoon. Let cool slightly; discard bay leaf and rosemary sprig.
- In blender or food processor, process tuna and reserved oil, mayonnaise, capers, anchovies and lemon juice to make smooth dip. Transfer to flat serving bowl. Drizzle with balsamic syrup. Serve with raw vegetables.
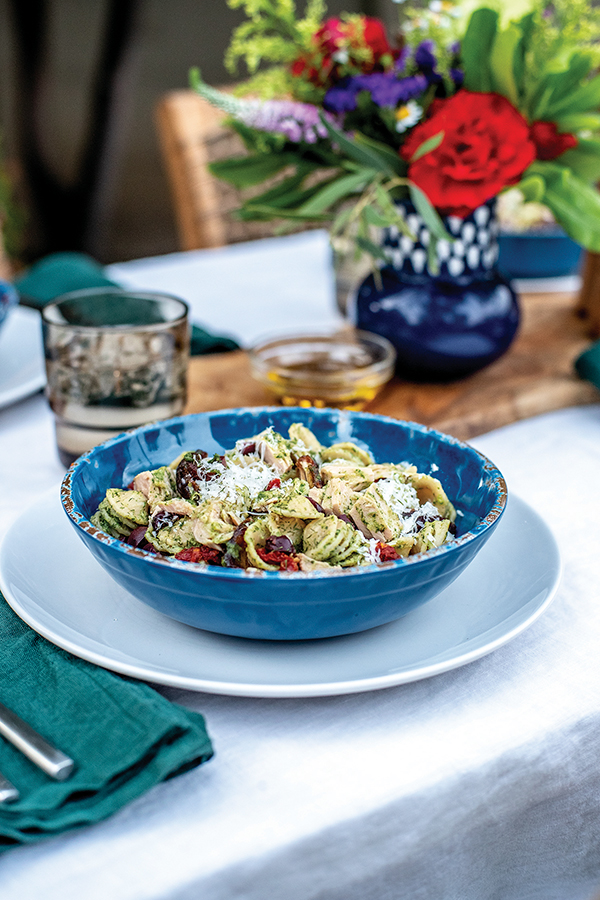
Yellowfin Tuna Pasta Salad with Arugula Pesto and Dates
Prep time: 20-30 minutes
Cook time: 20-25 minutes
Servings: 4
- 2 cans (5 ounces each) Genova Yellowfin Tuna in Olive Oil, drained
- 1/2 cup pine nuts
- 4 cups arugula
- 1 garlic clove
- 2 tablespoons butter (optional)
- 1 cup grated Parmigiano-Reggiano, plus additional for garnish (optional)
- 2 lemons, zest only (optional)
- 1/2 teaspoon kosher salt
- 1/2 teaspoon freshly ground black pepper
- 3/4 cup extra-virgin olive oil
- 8 ounces whole-wheat orecchiette
- 1/2 cup jarred sun-dried tomatoes in oil, chopped
- 1/2 cup dates, pitted and quartered
- 1/4 cup kalamata olives, pitted and chopped
- 1/4 cup dill, chopped (optional)
- 1/4 cup parsley, chopped (optional)
- Preheat oven to 325 F.
- On a sheet tray, toast pine nuts 8-12 minutes, or until golden. Set aside to cool.
- Bring large pot of salted water to boil. Prepare ice water bath by filling large bowl with cold water and ice. Stir arugula into boiling water and cook until bright green and tender, about 30 seconds. Drain arugula, immediately shock in ice water and set aside to fully drain; cover with towel.
- In blender or food processor, add arugula; garlic; pine nuts; butter, if desired; Parmigiano-Reggiano; lemon zest, if desired; salt; and pepper. Puree on high, incorporating olive oil to desired thickness.
- Place pesto in bowl and cover tightly to avoid discoloring.
- Bring large pot of salted water to boil.
- Add pasta and return to boil, stirring occasionally. Taste pasta for doneness 2 minutes earlier than package instructions. Once cooked, drain and transfer to large bowl. Do not rinse.
- Add pesto gently until evenly distributed. Fold in tuna, sun-dried tomatoes, dates and olives.
- Divide between shallow bowls and finish with additional Parmigiano-Reggiano, dill and parsley, if desired.
Source: Genova Tuna
A Truly Memorable Summer Menu
(Family Features) Summer days are often spent with family and friends, soaking in the sun’s rays and enjoying outdoor living with warm-weather activities. Complement this year’s summertime excitement with food that matches your enthusiasm for the season.
Your menu can start with a fruity dip and a salad before diving into steak for the main course and a kid-friendly treat to top it all off. These recipes make the most of what summer has to offer with fresh fruits and veggies, bright and refreshing greens, tender cuts of meat and frozen treats that celebrate those memorable moments together.
Find more summer recipe inspiration at Culinary.net.
Dip Up a Good Time
Whether your summer days include planning extravagant meals or your on-the-go lifestyle calls for quick and easy recipes, simple snacks can fit a wide variety of menus. Dips are a perfect solution for afternoon pick-me-ups or evening appetizers when the whole family comes together.
This Apple Guacamole can be made in mere minutes, making it an ideal shareable among loved ones, by combining mashed avocados and seasonings with chopped Granny Smith apple pieces.
Visit Culinary.net for more snack ideas.
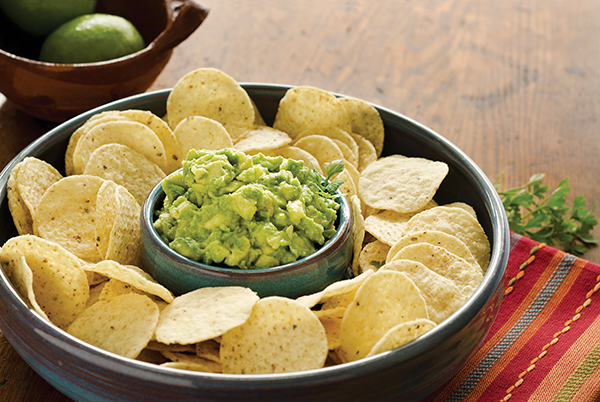
Apple Guacamole
Recipe adapted from the Meredith Corporation
Prep time: 10 minutes
Servings: 8-10
- 3 ripe avocados, halved and pitted
- 1/2 cup finely chopped Vidalia onion
- 1/2 cup snipped fresh cilantro
- 1 lime, juice only
- bottled hot pepper sauce, to taste
- 1 Granny Smith apple, peeled, cored and finely chopped
- kosher salt, to taste
- tortilla chips
- In bowl, use fork to mash avocados, onion, cilantro, lime juice and hot pepper sauce to desired consistency. Stir in apple and season with salt, to taste.
- Serve with tortilla chips.
Savor a Bite of Steak
A hearty flavor profile and perfectly prepared, high-quality meat can make a summer meal truly spectacular, especially when paired with fresh veggies in a protein-packed sandwich.
Inspired by Vietnamese tradition, this Steak Banh Mi recipe – which features tender grass-fed flat iron steak, pickled carrots, bright lettuce and crunchy cucumbers – is sure to be a crowd-pleaser at your next summer gathering. Take your taste buds to new heights with Silver Fern Farms natural cuts of 100% grass-fed beef from New Zealand, which is minimally processed with no added growth hormones or antibiotics. There, the animals roam and graze freely over lush green hills and pastures, resulting in lean, flavorful, nutritious meat that tastes just as nature intended.
Visit silverfernfarms.com for more inspiration.
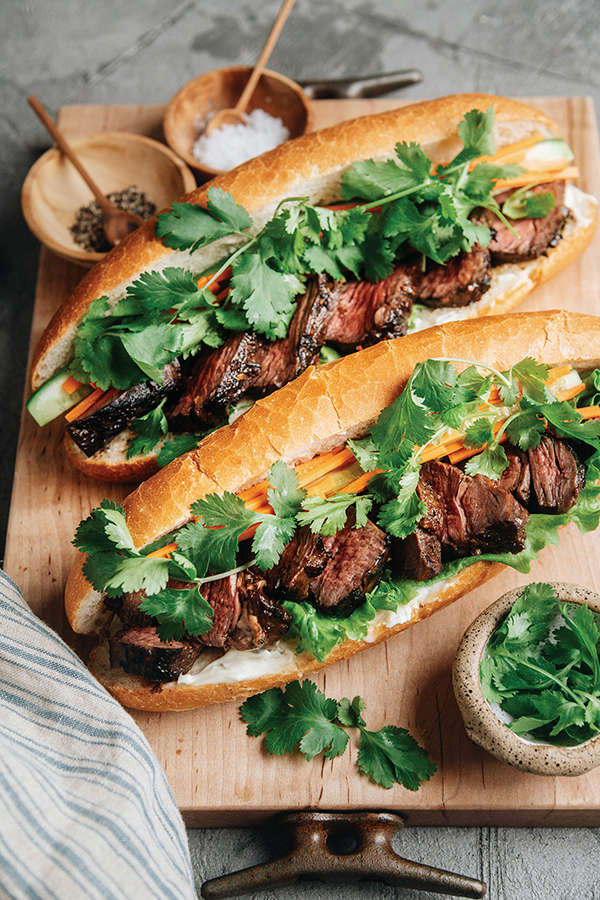
Steak Banh Mi
Prep time: 2 hours
Cook time: 15 minutes
Servings: 2
- 10 ounces Silver Fern Farms New Zealand grass-fed beef flat iron steak
- 2 teaspoons hoisin sauce
- 2 teaspoons soy sauce
- 2 teaspoons honey
- 1 teaspoon fish sauce
- 1 clove garlic, minced
- 1 teaspoon, plus 1/2 cup, rice vinegar, divided
- 1/8 teaspoon five-spice powder
- 2 tablespoons sugar
- 1 pinch salt
- 1 small carrot, cut into matchsticks
- 1 tablespoon vegetable oil
- 1/4 cup water
- 2 Vietnamese baguettes or dinner rolls
- 1/4 cup mayonnaise
- 4 Batavia lettuce leaves
- 1/4 cup cilantro, chopped
- 1 Persian cucumber, sliced
- Remove steak from packaging and set aside 10 minutes. Once steak reaches room temperature, place steak in deep plate or storage container. In small bowl, combine hoisin sauce, soy sauce, honey, fish sauce, garlic, 1 teaspoon rice vinegar and five-spice powder; pour over steak. Cover and marinate in fridge at least 2 hours, or overnight.
- In small pot over medium heat, heat remaining rice vinegar, sugar and salt. Cook and stir until sugar and salt dissolve. Remove from heat and let cool.
- Place carrots in deep plate or storage container. Pour cooled pickling liquid over carrots. Set aside to marinate.
- Remove steak from marinade and pat dry. Reserve marinade.
- Heat oven to 325 F.
- Heat heavy-bottomed pan over high heat and add oil. Once oil begins to smoke, add steak. Sear both sides, about 1 minute per side. Lower heat to medium.
- Add reserved marinade and water to pan. Cook, covered, 3 minutes, removing lid to flip meat occasionally. Remove lid and let sauce reduce 1 minute, or until slightly thickened.
- Transfer steak and sauce to large plate and let rest 10 minutes before slicing.
- Toast baguettes in oven 5 minutes. Let cool 5-10 minutes.
- Slice baguettes along middle without cutting through.
- Slice steak into thin pieces.
- Spread mayonnaise on baguettes and add 1-2 lettuce leaves to each. Layer steak on lettuce leaves followed by cilantro, cucumbers and pickled carrots. Slice baguette into two sandwiches.
Go for Satisfying Summer Greens
Many summer meals start with a simple yet satisfying appetizer: salad. This year, make sure you set the table with a bright, delightful bowl of greens that sets the tone for an enjoyable and festive meal with loved ones.
This Apple, Strawberry, Blueberry Salad calls for an array of fruits, including a homemade blueberry dressing, paired with Fresh Express 5-Lettuce Mix for a fresh and flavorful base with pecan halves to add crunch. The salads are thoroughly washed, rinsed and gently dried then sealed in Keep-Crisp bags to maintain freshness.
Find more salad inspiration at freshexpress.com.
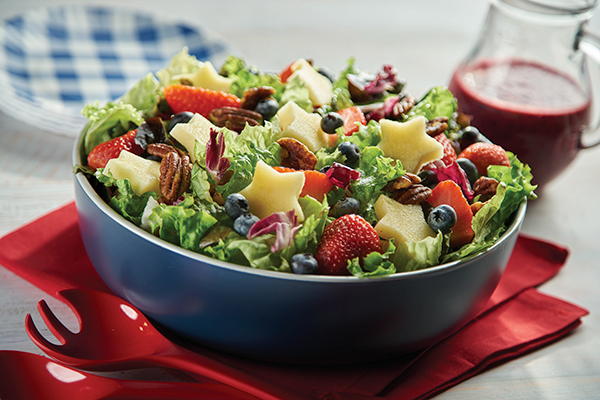
Apple, Strawberry, Blueberry Salad
Total Time: 30 minutes
Servings: 6
Blueberry Dressing:
- 2 cups fresh blueberries
- 1/4 cup balsamic vinegar
- 2 tablespoons honey
- 1 tablespoon lemon juice
- 1/2 cup olive oil
- salt, to taste
- pepper, to taste
- 2 large apples
- 2 packages (6 ounces each) Fresh Express 5-Lettuce Mix
- 1 pint strawberries, cut in half
- 1 pint blueberries
- 1/2 cup pecan halves, toasted
- blueberry dressing
- To make blueberry dressing: In blender, process blueberries, balsamic vinegar, honey, lemon juice, olive oil and salt and pepper, to taste, until smooth. Set aside.
- To prepare salad: Cut apples into 1/4-inch thick slices. Using 1-1/2-inch diameter star-shaped cutter, cut apple slices into stars.
- Place lettuce mix in large bowl; add apples, strawberries and blueberries. Sprinkle with pecans. Before serving, drizzle each salad with blueberry dressing.
Sweet, Summery Treats
After some fun in the pool and time spent in the sun, a cooling treat is often the perfect way to cap off a summer day. Fresh fruits make those sweet eats even tastier and easier by making dessert in the morning and letting it freeze while you enjoy the warmth outdoors.
These Watermelon Berry Frozen Pops make dessert about as simple as possible by blending watermelon, blueberries, raspberries and honey before adding to ice pop molds and freezing throughout the day. With the addition of refreshing watermelon, you’re opting for a flavorful fruit that includes just 80 calories and no fat while providing an excellent source of vitamin C (25%) and higher levels of lycopene (12.7 milligrams per 2-cup serving) – an antioxidant being studied for its role in sun protection – than any other fresh fruit or vegetable.
To find more summertime snacks, meals and treats, visit watermelon.org.
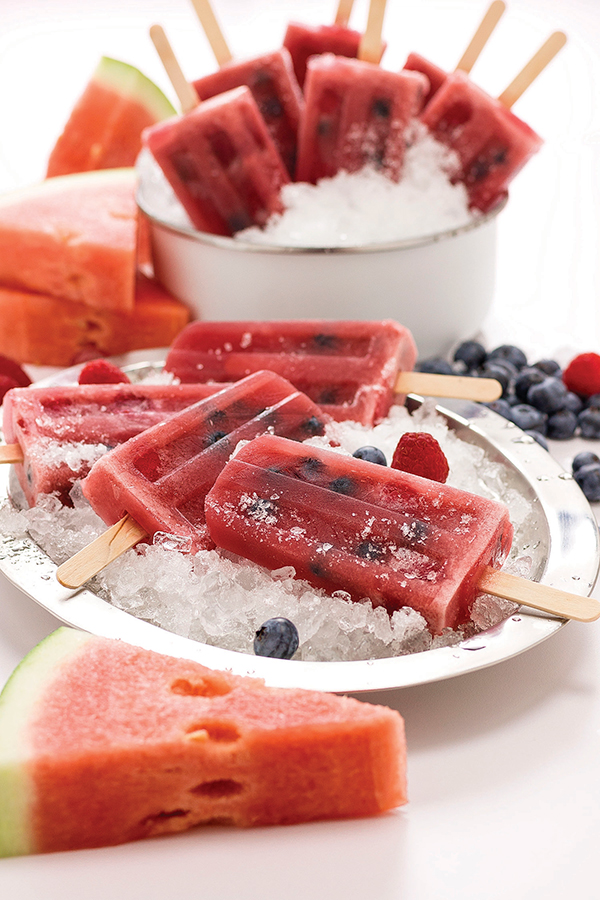
Watermelon Berry Frozen Pops
Servings: 8
- 6 cups watermelon
- 1 cup blueberries, divided
- 1 cup raspberries, divided
- 3 tablespoons honey
- In blender, blend watermelon, 1/2 cup blueberries, 1/2 cup raspberries and honey until smooth. Press through fine mesh strainer to remove pulp and seeds.
- Fill ice pop molds 3/4 full with liquid. Add remaining whole blueberries and raspberries to molds. Insert sticks and freeze at least 4 hours, or until completely frozen.
Photo courtesy of Getty Images (Apple Guacamole)
Source: Beef + Lamb New Zealand
Fresh Express
National Watermelon Promotion Board


