How to Make Caramel Apple Wraps
(Family Features) Snack time just got a bit sweeter. These wraps are simple enough to make that even kids can enjoy putting them together. For more snack recipes, visit culinary.net.
Watch video to see how to make this delicious recipe!

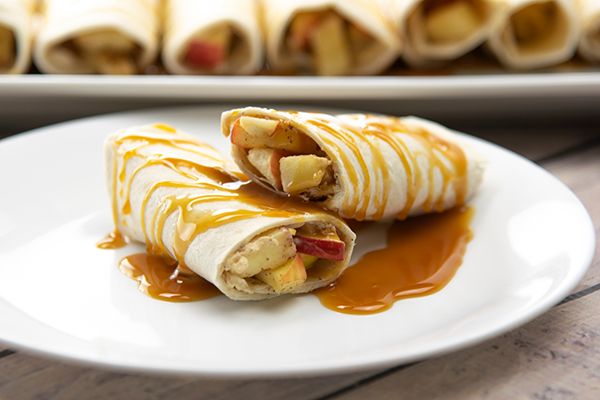
Caramel Apple Wraps
- 3 large apples, any kind
- 1 tablespoon granulated sugar
- 1/4 teaspoon ground cinnamon
- 1 cup fat-free vanilla Greek yogurt
- 1/3 cup creamy peanut butter, or almond butter
- 8-10 fajita-sized tortillas
- caramel sundae syrup
- Wash and dice apples. In medium bowl, mix sugar and cinnamon. Add diced apples to sugar mixture. Toss apples to coat.
- In small bowl, stir together yogurt and peanut butter until smooth.
- Layout tortillas and spread 2 tablespoons yogurt mixture on each. Spoon small amount of apple mixture at one end of each tortilla. Start from end with apples and roll tortillas.
- Drizzle with caramel syrup.
Recipe adapted from Milk Means More.
Source: Culinary.net
Make the Grade with Back-to-School Lunches
(Family Features) Back-to-school time means it’s back to being busy before, during and after school, so it’s time for parents and kids to create new routines. From early wakeup calls to shuttling kids to school and activities, ease the morning mayhem by incorporating a simple meal-planning strategy.
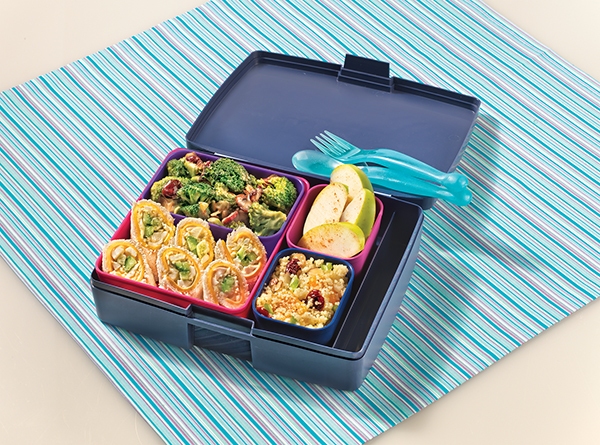
As a parent, look for fresh, make-ahead options your kids will enjoy. Serve up lunchbox love by mixing up the classic sandwich with a spin on sushi in this Bento Box Lunch recipe. It’s a creative way to deliver nutritious, wholesome ingredients that will make the whole lunchroom drool. Plus, it’s something you can take for lunch too.
No matter what meals you’re prepping, a store like ALDI can be your solution for packing tasty and better-for-you choices for lunches and on-the-go snacks. With high-quality ingredients at affordable prices, ALDI offers what you need to get ready for the days ahead.
For more recipes and meal prepping ideas, visit aldi.us.

Bento Box Lunch
Recipe courtesy of Chef Alyssa, ALDI Test Kitchen
Prep time: 10 minutes
Cook time: 30 minutes
Total time: 40 minutes
Servings: 4
“Sushi Roll”:
- 4 slices SimplyNature Knock Your Sprouts Off Sprouted Low Sodium 7 Grain Bread
- 4 slices Lunch Mate Never Any! Turkey
- 1 teaspoon Burman's Yellow Mustard
- 1/2 avocado, sliced
- 1 mini cucumber, cut into 3-inch-by-1/4-inch sticks
Quinoa Salad:
- 1 cup SimplyNature Organic Quinoa, cooked
- 1/4 cup Southern Grove Sliced Almonds
- 2 mandarin oranges, peeled and separated
- 1/4 cup Southern Grove Dried Cranberries
- 1 bunches green onions, sliced
- 1 teaspoon Carlini Pure Olive Oil
- Stonemill Iodized Salt, to taste
- Stonemill Ground Black Pepper, to taste
Broccoli Salad:
- 1 large head broccoli, chopped
- 1/4 cup Southern Grove Sliced Almonds
- 1/4 cup Southern Grove Dried Cranberries
- 1 teaspoon Fusia Soy Sauce
- 1/2 cup Friendly Farms Vanilla Nonfat Greek Yogurt
- Stonemill Ground Black Pepper, to taste
Cinnamon Apples:
- 1 Granny Smith apple, sliced
- 1 tablespoon Nature's Nectar Lemon Juice
- 1 teaspoon Stonemill Ground Cinnamon
- To make “Sushi Roll”: Trim crust from bread. Using rolling pin, roll out bread slices to 1/8-inch thickness. Top with turkey, mustard, avocado and cucumber. Roll into cylinder, wrap with plastic wrap and cut in half.
- To make Quinoa Salad: In medium bowl, combine quinoa, almonds, oranges, cranberries, green onions and olive oil; season to taste with salt and pepper.
- To make Broccoli Salad: In medium bowl, combine broccoli, almonds, cranberries, soy sauce and yogurt; season to taste with pepper.
- To make Cinnamon Apples: Toss apples with lemon juice and cinnamon. Place in sandwich bags and wrap tightly.
- Organize equal amounts of “Sushi Rolls,” Quinoa Salad, Broccoli Salad and Cinnamon Apples in separate bento box compartments.
Source: ALDI
Creative, Kid-Size Snacks
(Family Features) The ultimate kid-friendly snack comes as a package deal – simple, delicious, nutritious and fun. One option that readily meets those demands are apples, pears and oranges perfectly sized for small hands, mouths and appetites.
While Lil Snappers’ smaller sizes allow fresh fruits to easily fit into bento boxes and brown bags for a wholesome lunchbox companion that leaves little waste, a dash of creativity also transforms these fruits into a favorite snacktime star – from crunchy critters to sweet treats.
Available in three-pound pouches and found in the fresh produce aisle, Lil Snappers come seasonally in a wide array of fruit varieties, including organics, grown by a sixth-generation family farming operation, Stemilt Growers. Options range from popular apples such as Gala, Pink Lady and Granny Smith, to delicious Bartlett pears, Bosc pears and more.
Try out these recipes for pint-sized snackers, and find quick and easy recipe ideas at lilsnappers.com.

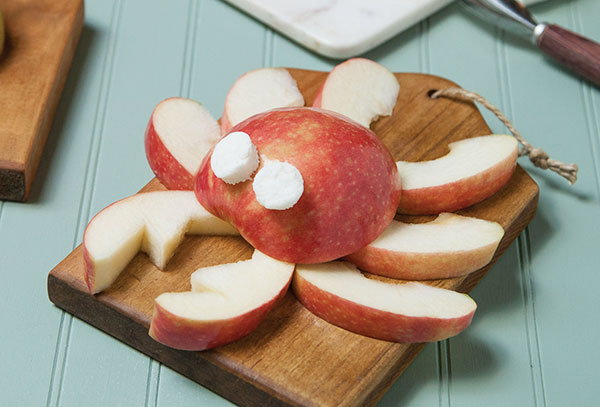
Crab Critter
- 1 Lil Snappers apple
- 1 mini marshmallow
- Cut apple in half lengthwise and remove stem. Remove core from one apple half.
- Slice apple half without core into 8 wedges to serve as critter’s legs.
- Set aside second apple half, which will serve as critter’s body.
- Take two legs and make simple zig-zag cuts into flesh to create “claw-like” shape.
- On a plate, arrange critter’s legs, fanning them out, then place claws in front of legs and reserved apple half on top for the head.
- Cut mini marshmallow in half. Gooey side of each will easily stick to critter’s head to serve as eyes.

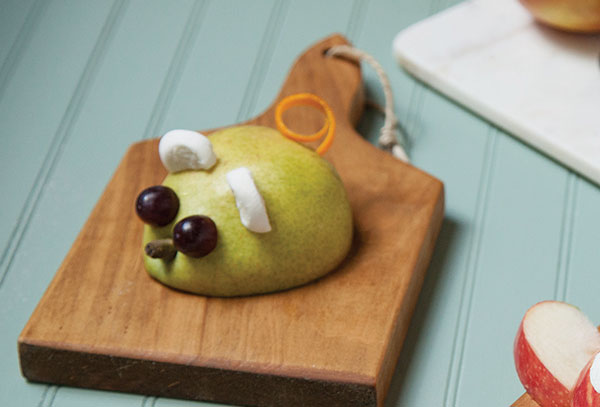
Little Mouse
- 1 Lil Snappers pear
- 1 slice orange rind
- 1 marshmallow
- 1 grape
- 2 toothpicks
- Cut pear in half lengthwise. On plate, lay pear cut-side down. Using peeler, slice 3 inches of rind from orange. Trim sides to result in long, thin rectangle. Coil length of rind around finger and hold to set shape.
- Cut one slice from end of marshmallow then cut that round in half to create two half-moon shapes. Gooey edge of each half-moon will stick to top of pear half to serve as critter’s ears.
- Break toothpick in half and place picks in location for critter’s eyes, leaving about 1/4 inch sticking out from fruit.
- Slice ends off of one grape and place domes over toothpicks to serve as eyes.
- Using toothpick, make hole in back end of critter to place tail. Stick end of coiled orange rind into hole using toothpick to wedge rind into fruit. Reshape coil, as needed.
Note: Remember to remove toothpicks before nibbling.
Source: Stemilt Growers
Fulfill Your Family’s Nutrition Mission
(Family Features) Eating healthy as a family starts with a plan involving nutritious ingredients, and one of the easiest ways to incorporate them is through meal prepping. By organizing recipes and the ingredients you’ll need to make them ahead of time, you’re saving time in the kitchen and helping ensure your family members won’t go off-course.
Dishes like Chicken Cauliflower Fried Rice and Mini Apple Pie Empanadas, ideal for a weekday family dinner and dessert, involve using fresh produce to encourage nutritious eating habits. Plus, because the recipes take little time to assemble and cook, you’ll save yourself more precious moments to spend at the table with loved ones.
These recipes are part of the “Mission for Nutrition” by Produce for Kids, an effort to raise awareness on the importance of meal planning and preparation to achieve regular healthy family eating together. In addition, partners of the program will donate 800,000 meals to families in need through Feeding America.
To find more information and recipes, and to download a free e-book including meal-planning ideas, visit themissionfornutrition.com.
Mini Apple Pie Empanadas
Recipe courtesy of Produce for Kids
Prep time: 15 minutes
Cook time: 25 minutes
Servings: 12
- 4 cups peeled, sliced Gala apples
- 1/4 cup maple syrup
- 1 tablespoon cornstarch
- 1 teaspoon cinnamon
- 12 frozen empanada shells, thawed
- 1 large egg white, beaten
- Heat skillet over low heat. Add apples, syrup, cornstarch and cinnamon. Cook 10 minutes, stirring frequently, or until apples are tender.
- Line center of each empanada shell with apples; fold and use fork to press edges together and seal. Brush with egg wash.
- Heat oven to 375° F.
- Place sealed empanadas on parchment-lined baking sheet. Bake 25-30 minutes, or until golden brown.
Tip: To make in air fryer: Heat air fryer to 375° F. Spray air fryer basket with nonstick cooking spray. Add sealed empanadas and cook 8 minutes, or until golden brown.

Chicken Cauliflower Fried Rice
Recipe courtesy of Produce for Kids
Prep time: 15 minutes
Servings: 4
- 2 teaspoons olive oil
- 12 ounces boneless, skinless chicken breasts, chopped
- 1 package Green Giant Fresh Cauliflower Crumbles fried rice blend
- 1 large egg, scrambled
- In large skillet over medium heat, heat oil. Add chicken and cook 5 minutes, or until cooked through. Remove from skillet.
- Add cauliflower crumbles. Cook 5 minutes, or until tender. Push to edge of skillet to make hole in middle. Pour egg into center and cook, stirring frequently, 2-3 minutes, or until firm. Add chicken back to pan and stir to combine.
Source: Produce for Kids
Cinnamon-Apple Crostata
Need a dessert that is not only delicious but easy to make? Try this recipe for Cinnamon-Apple Crostata. You'll have a hard time waiting to sink your teeth in to the flaky crust with a burst of cinnamon and apples. Find more delicious dessert recipes at Culinary.net.
Watch video to see how to make this delicious dessert!


Cinnamon-Apple Crostata
- Pie Pastry (we used Pillsbury Refrigerated Pie Crusts)
Filling
- 1/2 cup sugar
- 4 tsp. cornstarch
- 2 tsp. cinnamon
- 4 cups peeled and thinly sliced apples (4-5 medium sized)
- 1 tsp. sugar (for sprinkling)
- 2 tbs. chopped pecans
- Heat oven to 450°.
- In medium bowl mix together 1/2 cup sugar, cornstarch and cinnamon. Stir in peeled and sliced apples until well combined.
- Place flattened pie crust on an ungreased cookie or pizza sheet.
- Spoon apple mixture onto the center of the crust, spreading the mixture to about 2 inches from the edge of the crust.
- Fold crust over mixture, pleating along the way.
- Brush edges of crust with water.
- Sprinkle sugar over crust and apple mixture.
- Bake for 15-20 minutes or until crust is a golden brown.
- Sprinkle pecans over apple mixture.
- Serve with a dollop of whipped cream.
Recipe adapted from Pillsbury.
Source: Culinary.net
Impressive Fruit Pies and Tarts Made Easy
(Family Features) Berry season means colors, tastes and aromas that are sure to please. With a variety of gorgeous fresh fruits at your fingertips, why not whip up a fabulous fruit pie or tart to surprise family or share with friends? From family dinners to spur-of-the-moment picnics, pies are easy to make and easy for family and friends to appreciate.
To save time in the kitchen, start with Pillsbury Refrigerated Pie Crusts for a flaky, tender base. Just unroll it into your favorite pie plate or tart pan, spoon in a delicious fruit filling, bake and enjoy. Pillsbury has updated the packaging with a fresh, contemporary look and features a recipe for Perfect Apple Pie. For more delicious recipes, visit www.pillsbury.com/pie.
Make Crusts Extra Special
When making a top crust for pies, these tips can help you make them look extra special.
Glossy Upper Crust: Brush the dough with slightly beaten egg white (if desired, sprinkle with sugar, too) before baking.
Sweet Glazed Top: Brush the top pastry with a small amount of water, and sprinkle with granulated or coarse sugar before baking.
Pretty Cutouts: Cut shapes from the top crust with a canapé cutter or a knife before placing the top crust over the filling. With water or beaten egg, moisten the back of each cutout and set the design, moistened side down, on the crust.

Perfect Apple Pie
8 servings
Prep time: 30 minutes
Ready in: 3 hours
Crust
- 1 box (14.1 ounces) Pillsbury refrigerated pie crusts, softened as directed on box
Filling
- 6 cups thinly sliced, peeled apples (6 medium)
- 3/4 cup sugar
- 2 tablespoons all-purpose flour
- 3/4 teaspoon ground cinnamon
- 1/4 teaspoon salt
- 1/8 teaspoon ground nutmeg
- 1 tablespoon lemon juice
- Heat oven to 425°F. Place 1 pie crust in ungreased 9-inch glass pie plate. Press firmly against side and bottom.
- In large bowl, gently mix filling ingredients; spoon into crust-lined pie plate. Top with second crust. Wrap excess top crust under bottom crust edge, pressing edges together to seal; flute. Cut slits or shapes in several places in top crust.
- Bake 40 to 45 minutes or until apples are tender and crust is golden brown. Cover edge of crust with 2- to 3-inch-wide strips of foil after first 15 to 20 minutes of baking to prevent excessive browning. Cool on cooling rack at least 2 hours before serving.
Tip: Two cans (21 ounces each) apple pie filling can be substituted for the filling.

Lemon Raspberry Pie
8 servings
Prep time: 45 minutes
Start to finish: 3 hours 45 minutes
Crust
- 1 Pillsbury refrigerated pie crust (from 14.1-ounce box), softened as directed on box
- 1 teaspoon flour
- 2 tablespoons finely chopped pecans
Filling
- 1/2 cup sugar
- 2 tablespoons cornstarch
- 1/2 cup water
- 2 tablespoons margarine or butter
- 1 egg yolk, beaten
- 1/4 to 1/3 cup lemon juice
Topping
- 2 3-ounce packages cream cheese, softened
- 1/4 cup powdered sugar
- 1/2 teaspoon lemon extract
- 1 8-ounce carton frozen whipped topping, thawed
- 1 tablespoon milk
- 3 cups fresh raspberries or frozen raspberries without syrup, thawed, dried on paper towels
- Mint sprigs, if desired
- Heat oven to 450°F. Prepare crust according to package directions for unfilled one-crust pie using 9-inch pie pan. Press pecans into bottom of pie crust-lined pan. Generously prick crust with fork. Bake for 9 to 11 minutes or until light golden brown. Cool completely.
- In small saucepan, combine sugar and cornstarch; blend well. Stir in water, margarine and egg yolk. Cook over medium heat until mixture boils and thickens, stirring constantly. Boil 1 minute. Remove from heat. Stir in lemon juice. Pour into cooled crust. Refrigerate 1 hour.
- In small bowl, beat cream cheese, powdered sugar and lemon extract until smooth. Beat in whipped topping at low speed until well blended. Add milk; mix until smooth and of spreading consistency. Spread thin layer of topping mixture around edge of crust. Reserve 4 raspberries for garnish. Arrange remaining raspberries over top of filling. Spread remaining topping over raspberries. Garnish with mint sprigs and reserved raspberries. Refrigerate 2 hours before serving. Store in refrigerator.

Fresh Berry Cream Tart
8 servings
Prep time: 15 minutes
Start to finish: 2 hours 55 minutes
Crust
- 1 Pillsbury refrigerated pie crust (from 14.1-ounce box), softened as directed on box
Filling
- 1 8-ounce package cream cheese, softened
- 1/3 cup sugar
- 1 tablespoon orange-flavored liqueur or orange juice
- 4 cups assorted fresh whole berries (small strawberries, blueberries, raspberries, and/or blackberries)
- 1/3 cup red currant jelly, melted
- Heat oven to 450°F. Prepare pie crust as directed on package for one-crust baked shell using 9-inch tart pan with removable bottom. Bake for 9 to 11 minutes or until light golden brown. Cool completely.
- In small bowl, combine cream cheese, sugar and liqueur; beat until smooth and well blended. Spread cream cheese mixture evenly in cooled baked shell. Top with berries; brush berries with melted jelly to glaze. Refrigerate at least 2 hours before serving. Store in refrigerator.
Source: Pillsbury
Heart-Smart Recipes You’ll Love
(Family Features) Eating for heart health is actually easier — and more delicious — than you might think. When you have a good plan and plenty of mouthwatering recipes, you’ll enjoy taking care of your heart.
According to the FDA, diets rich in whole grain foods and other plant foods, and low in saturated fat and cholesterol, may help reduce the risk of heart disease. Here are some tips to help you make these kinds of heart-smart choices:
- Choose leaner cuts of meat. You can find plenty of delicious options such as skinless chicken, lean pork and beef. And you can make smart substitutions, too — use ground turkey instead of ground beef to make meatloaf or burgers even leaner.
- Add fruits and veggies to every meal. Strawberries in yogurt, blueberries on a salad, carrots and hummus as a snack, roasted sweet potatoes with dinner — it’s easier than you think to add nutrient-dense produce to your diet. Eat plenty of different colored produce for variety and a wider range of health benefits.
- Enjoy more whole grains. Whole grains add carbohydrates for energy, fiber to fill you up, and nutrients important for good health. And, according to a recent national survey, 4 out of 5 doctors recommend Post Shredded Wheat as part of a healthy, low-sodium diet, to maintain a healthy heart, reduce the risk of heart disease, and support healthy blood pressure levels.
These recipes are a great start to adding more whole grains — and they’re so good, you might forget they are heart smart. Get more tips and heart-smart recipes at www.PostShreddedWheat.com.

Apple Crisp
Total Time: 65 minutes
Makes: 6 servings
- 5 cups peeled apple slices
- 1/2 cup firmly packed light brown sugar, divided
- 1 tablespoon lemon juice
- 1 tablespoon tapioca
- 1/4 teaspoon ground cinnamon
- 1 1/2 cups Post Original Shredded Wheat Spoon Size Cereal, finely crushed
- 1/4 cup (1/2 stick) margarine, melted
- Preheat oven to 350°F.
- Mix apples, 1/4 cup sugar, lemon juice, tapioca and cinnamon in large bowl. Let stand 10 minutes.
- To make topping: stir crushed cereal, remaining 1/4 cup sugar and margarine in medium bowl until well blended.
- Spread apple mixture in ungreased 1 1/2-quart baking dish. Sprinkle evenly with cereal topping.
- Bake for 45 minutes or until topping is browned and apples are tender when pierced with fork.

Savory Meatloaf
Total Time: 75 minutes
Makes: 12 servings
- 2 eggs
- 1 cup milk
- 2 pounds lean ground beef
- 3 biscuits Post Original Shredded Wheat Cereal, crushed
- 1 can (8 ounces) stewed tomatoes, undrained
- 1 medium onion, chopped
- 1/4 cup chopped green pepper
- 2 teaspoons Worcestershire sauce
- 2 teaspoons salt
- 1/4 teaspoon ground black pepper
- Preheat oven to 375°F.
- Beat eggs and milk in large bowl with wire whisk until well blended. Add remaining ingredients; mix well.
- Shape meat mixture into oval loaf in shallow baking pan.
- Bake 1 hour or until cooked through (160°F).
Variation: Prepare as directed, using fat-free milk and substituting 1/2 cup cholesterol-free egg product for the eggs and 2 pounds thawed frozen ground turkey for the ground beef.

Grab ’n Go Peanut Butter Bars
Total Time: 10 minutes
Makes: 16 servings (1 bar per serving)
- 1/2 cup firmly packed brown sugar
- 1/2 cup honey
- 1/2 cup reduced fat peanut butter
- 3 cups Post Original Shredded Wheat Spoon Size Cereal, coarsely crushed
- 3/4 cup raisins
- Mix sugar, honey and peanut butter in large microwavable bowl. Microwave on high 1 1/2 to 2 minutes or until bubbly at edge; stir until well blended.
- Stir in cereal and raisins.
- Press firmly into 8-inch square pan sprayed with cooking spray. Cool. Cut into bars.
- Store in airtight container.
Take Along Tip: After completely cooled, wrap bars individually in plastic wrap. Leave in bowl on kitchen counter for a great grab-and-go snack.

Banana Bread
Total Time: 65 minutes
Makes: 16 servings (1 slice per serving)
- 1 3/4 cups flour
- 1 cup Post Original Shredded Wheat Spoon Size Cereal, finely crushed
- 1 teaspoon pumpkin pie spice
- 1/2 teaspoon baking powder
- 1/2 teaspoon baking soda
- 1 cup sugar
- 1/2 cup (1 stick) margarine
- 2 eggs
- 1/4 cup fat-free milk
- 1 cup mashed ripe bananas (about 2 large bananas)
- Preheat oven to 350°F. Mix flour, cereal, spice, baking powder and baking soda in medium bowl; set aside.
- Beat sugar and margarine in large bowl with electric mixer on medium speed until light and fluffy. Add eggs; mix well. Add flour mixture alternately with milk, beating well after each addition. Blend in bananas.
- Pour into greased 9x5-inch loaf pan. Bake 1 hour to 1 hour 5 minutes or until toothpick inserted in center comes out clean. Cool in pan 10 minutes on wire rack; remove from pan.
- Cool completely.
Special Extra: Toast the bread slices and top each with a scoop of vanilla or chocolate sorbet and a drizzle of strawberry sauce for a different kind of banana split.
Source: Post Foods, LLC


